Rainbow Mountain in Peru has become a very famous tourist attraction in a short amount of time. Being originally covered in snow and unknown for the world, climate change melted the snow and revealed this colourful mountain. Now, this 5,200 m / 17,000 ft peak attracts thousand of tourists looking for a picture for Instagram and an adventure. For this reason it is extremely easy to visit Rainbow Mountain.
The basics of our day-trip to Rainbow Mountain:
Duration: 1 day
Date of travel: 29th of June, 2019
Number of travellers: four people
Time of preparation: 1 day
In this post you will find a compilation of all the information you need to prepare your visit to Rainbow Mountain. We cover how to arrive in a group tour or on your own or how is the experience in terms of difficulty and altitude sickness. Also, you will find indications on how to dress for the climb considering the weather conditions you will likely encounter. Finally, we answer the most important questions we had: is it worth it? How does it really look?
Contents
1. Rainbow Mountain: general information
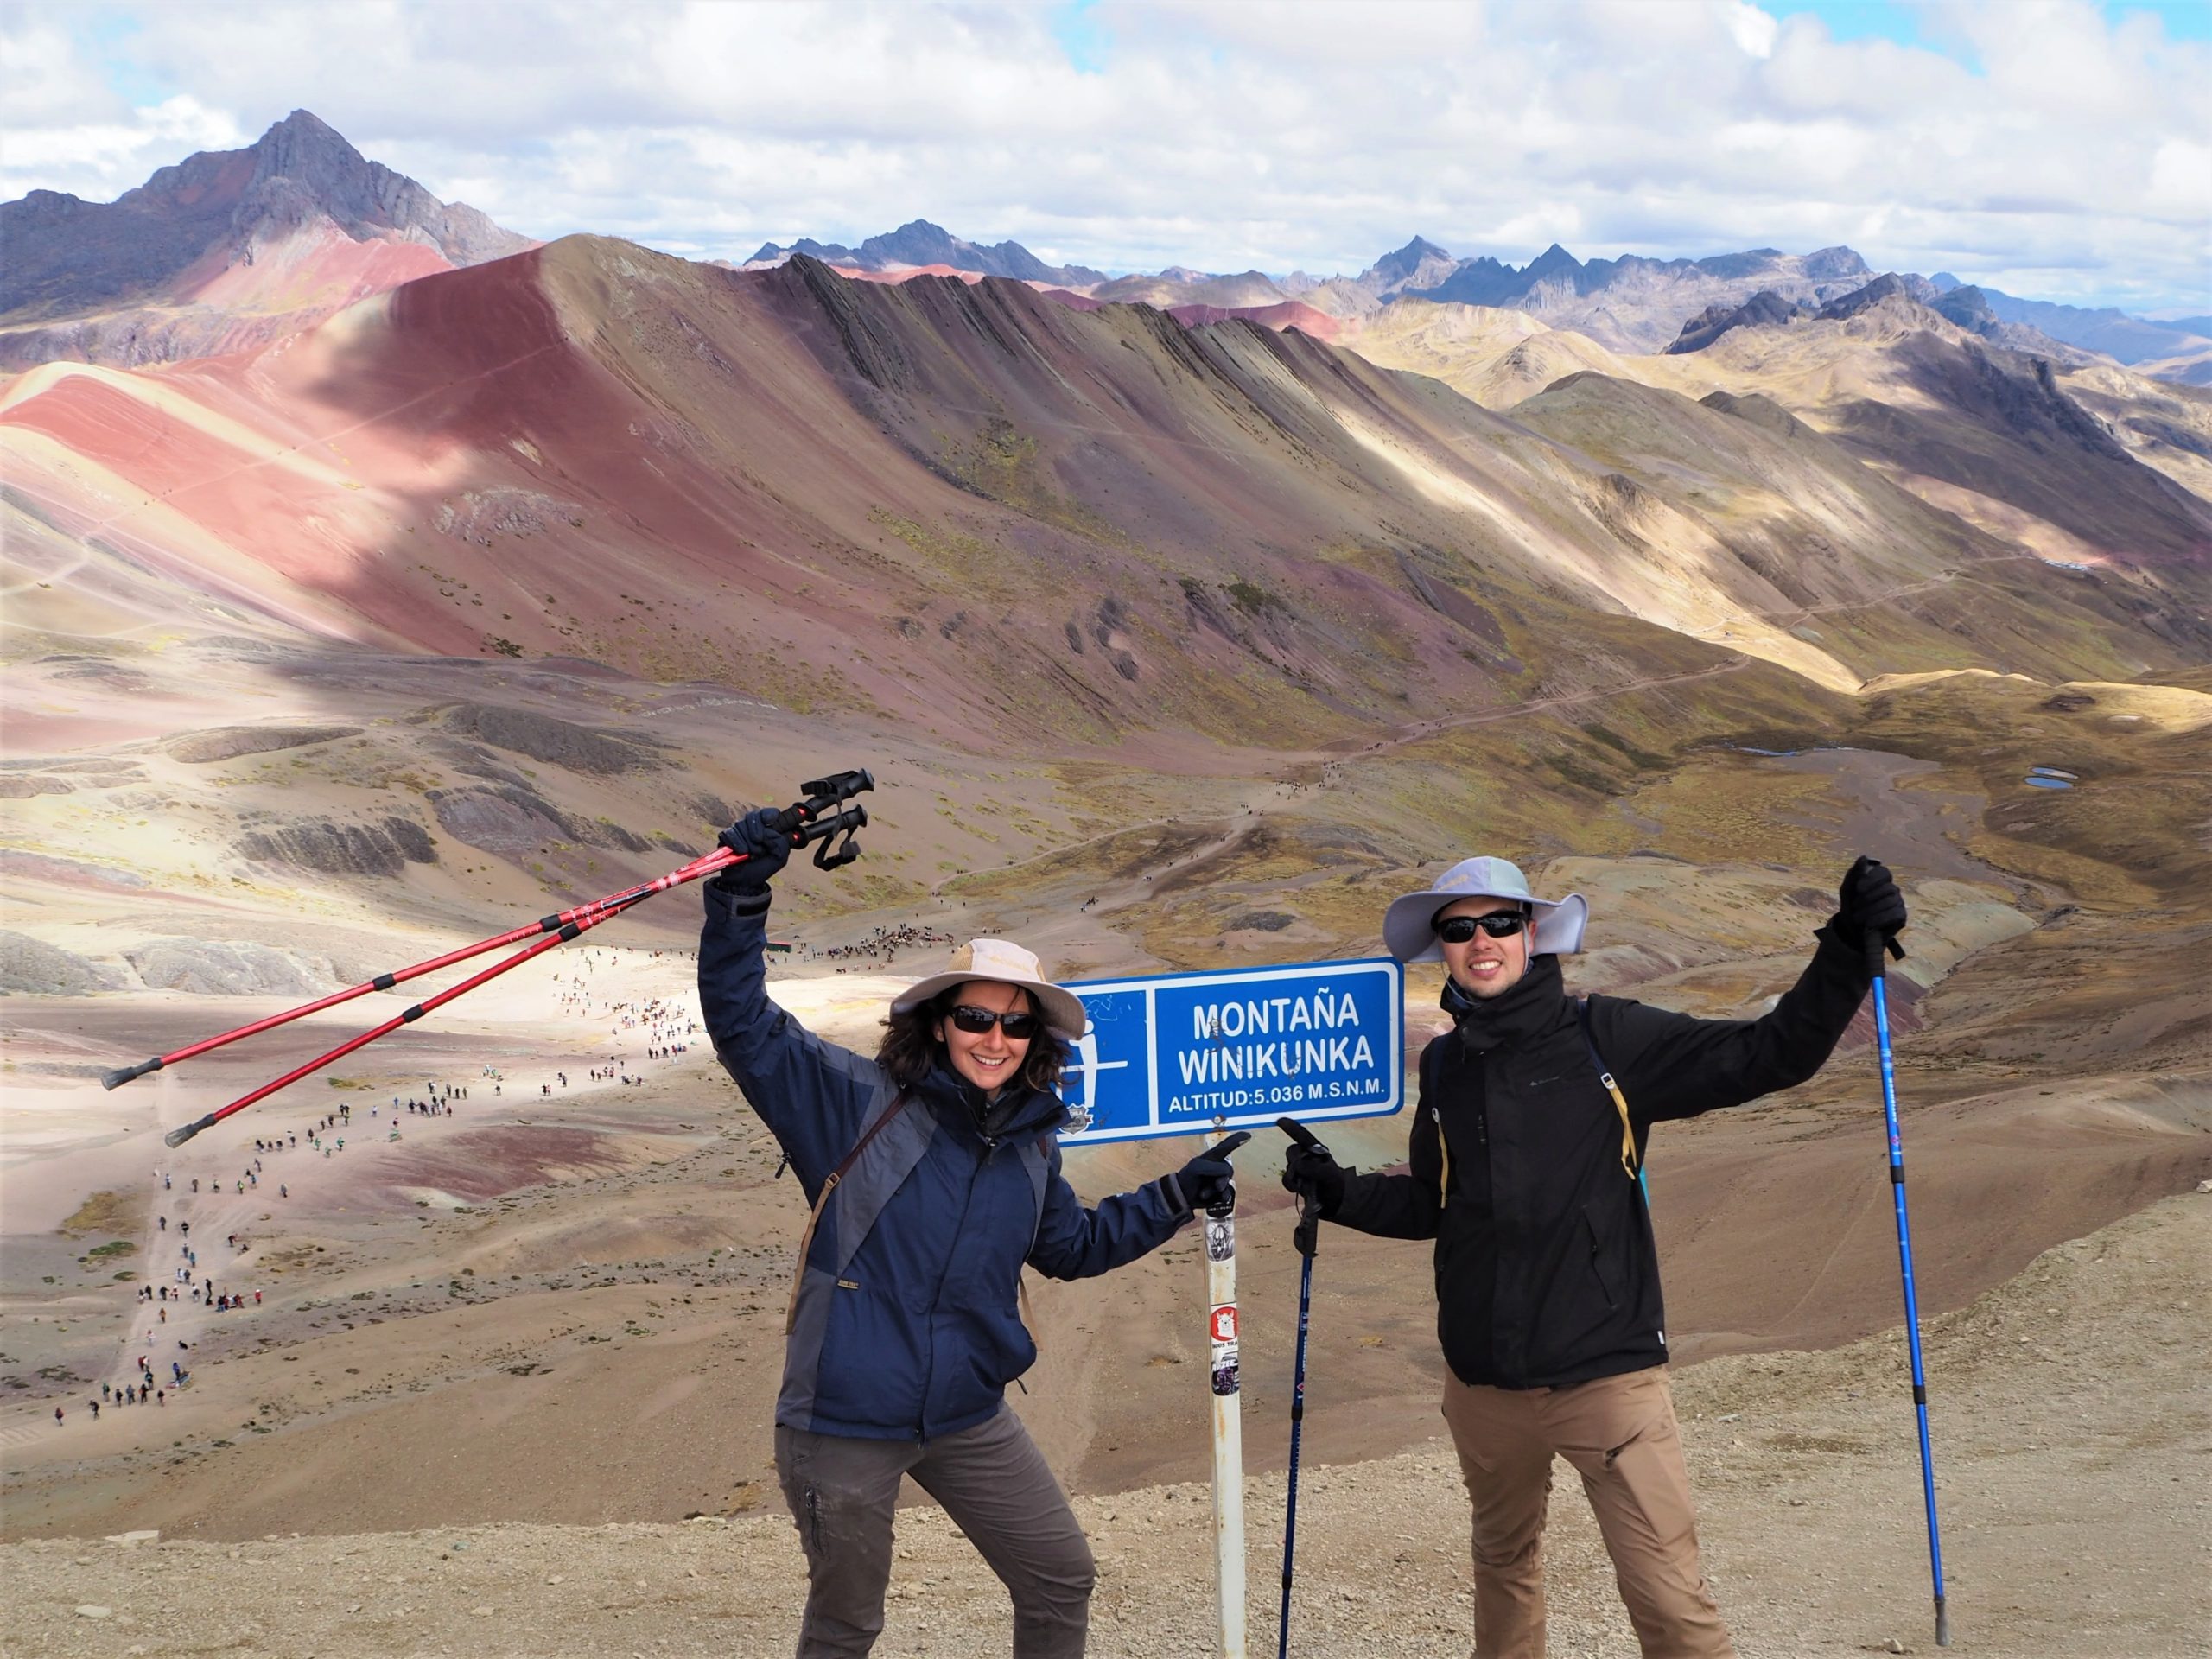
Rainbow Mountain, also known as Vinicunca or Winikunka, became famous to the world on 2015. Climate change and raising temperatures melted the snow that had since then covered the peak, and the famous seven colours of rainbow were revealed. Instagram and social media soon did their magic and transformed this unknown place in one of the most desired pictures for travellers.
It is located in the Andes of Peru, next to the Ausangate Mountain and 140 km / 85 mi from Cusco. Its high altitude, 5,200 m / 17,000 ft, require from visitors a little previous acclimation to lack of oxygen and may transform a generally easy hike in a challenge.
Regarding the hike, it was previously necessary to walk for 15 km / 9 mi to reach the viewpoint, however, from 2018 or so a new road is available to bring tourists closer to the peak. Therefore, now the hike has been reduced to 5 km / 3 mi (one way), with an elevation gain of approximately 600 m / 2,000 ft. It generally lasts 1.5 – 2 hours depending on the level of fitness. So, when you look for further information regarding this trip, be sure to check it is up to date!
Is Rainbow Mountain worth it?
It took us a lot of time to figure this out. From the moment we decided to visit Peru, months before our trip, to just the day before actually going to Rainbow Mountain. We were so hesitant because we had read a lot of opinions defending both going and not going.
We had the feeling that it would be a very beautiful landscape, but filled with tourists who, like us, wanted the Instagram picture. The high altitude was an argument for both decisions. On the one hand, it would be the highest we had ever been and we definitely wanted that. On the other, we came from the Salkantay Trek, where we had experienced a little altitude sickness and a lot of tiredness. We were not really looking forward to suffer too much just for a picture.
So the day before our last day at Cusco and therefore our last opportunity to visit Rainbow Mountain, we went to a café owned by a Mexican guy who had been living in Peru for a while. He told us about his experience in Rainbow Mountains a few years back and convinced us to go. What made the trick is that he explained that not only the instagrammable spot, but also the whole surroundings are breathtaking.
And boy are we glad we listened! For us, it was totally worth it: the landscapes were amazing and altitude sickness was very mild. We particularly enjoyed our side visit to Red Valley, as we had no expectations and it greatly surprised us.
I can assure you that the views are very worth the climb. Therefore, I would only suggest you to consider how familiarised are you with high altitude and how it may affect you.
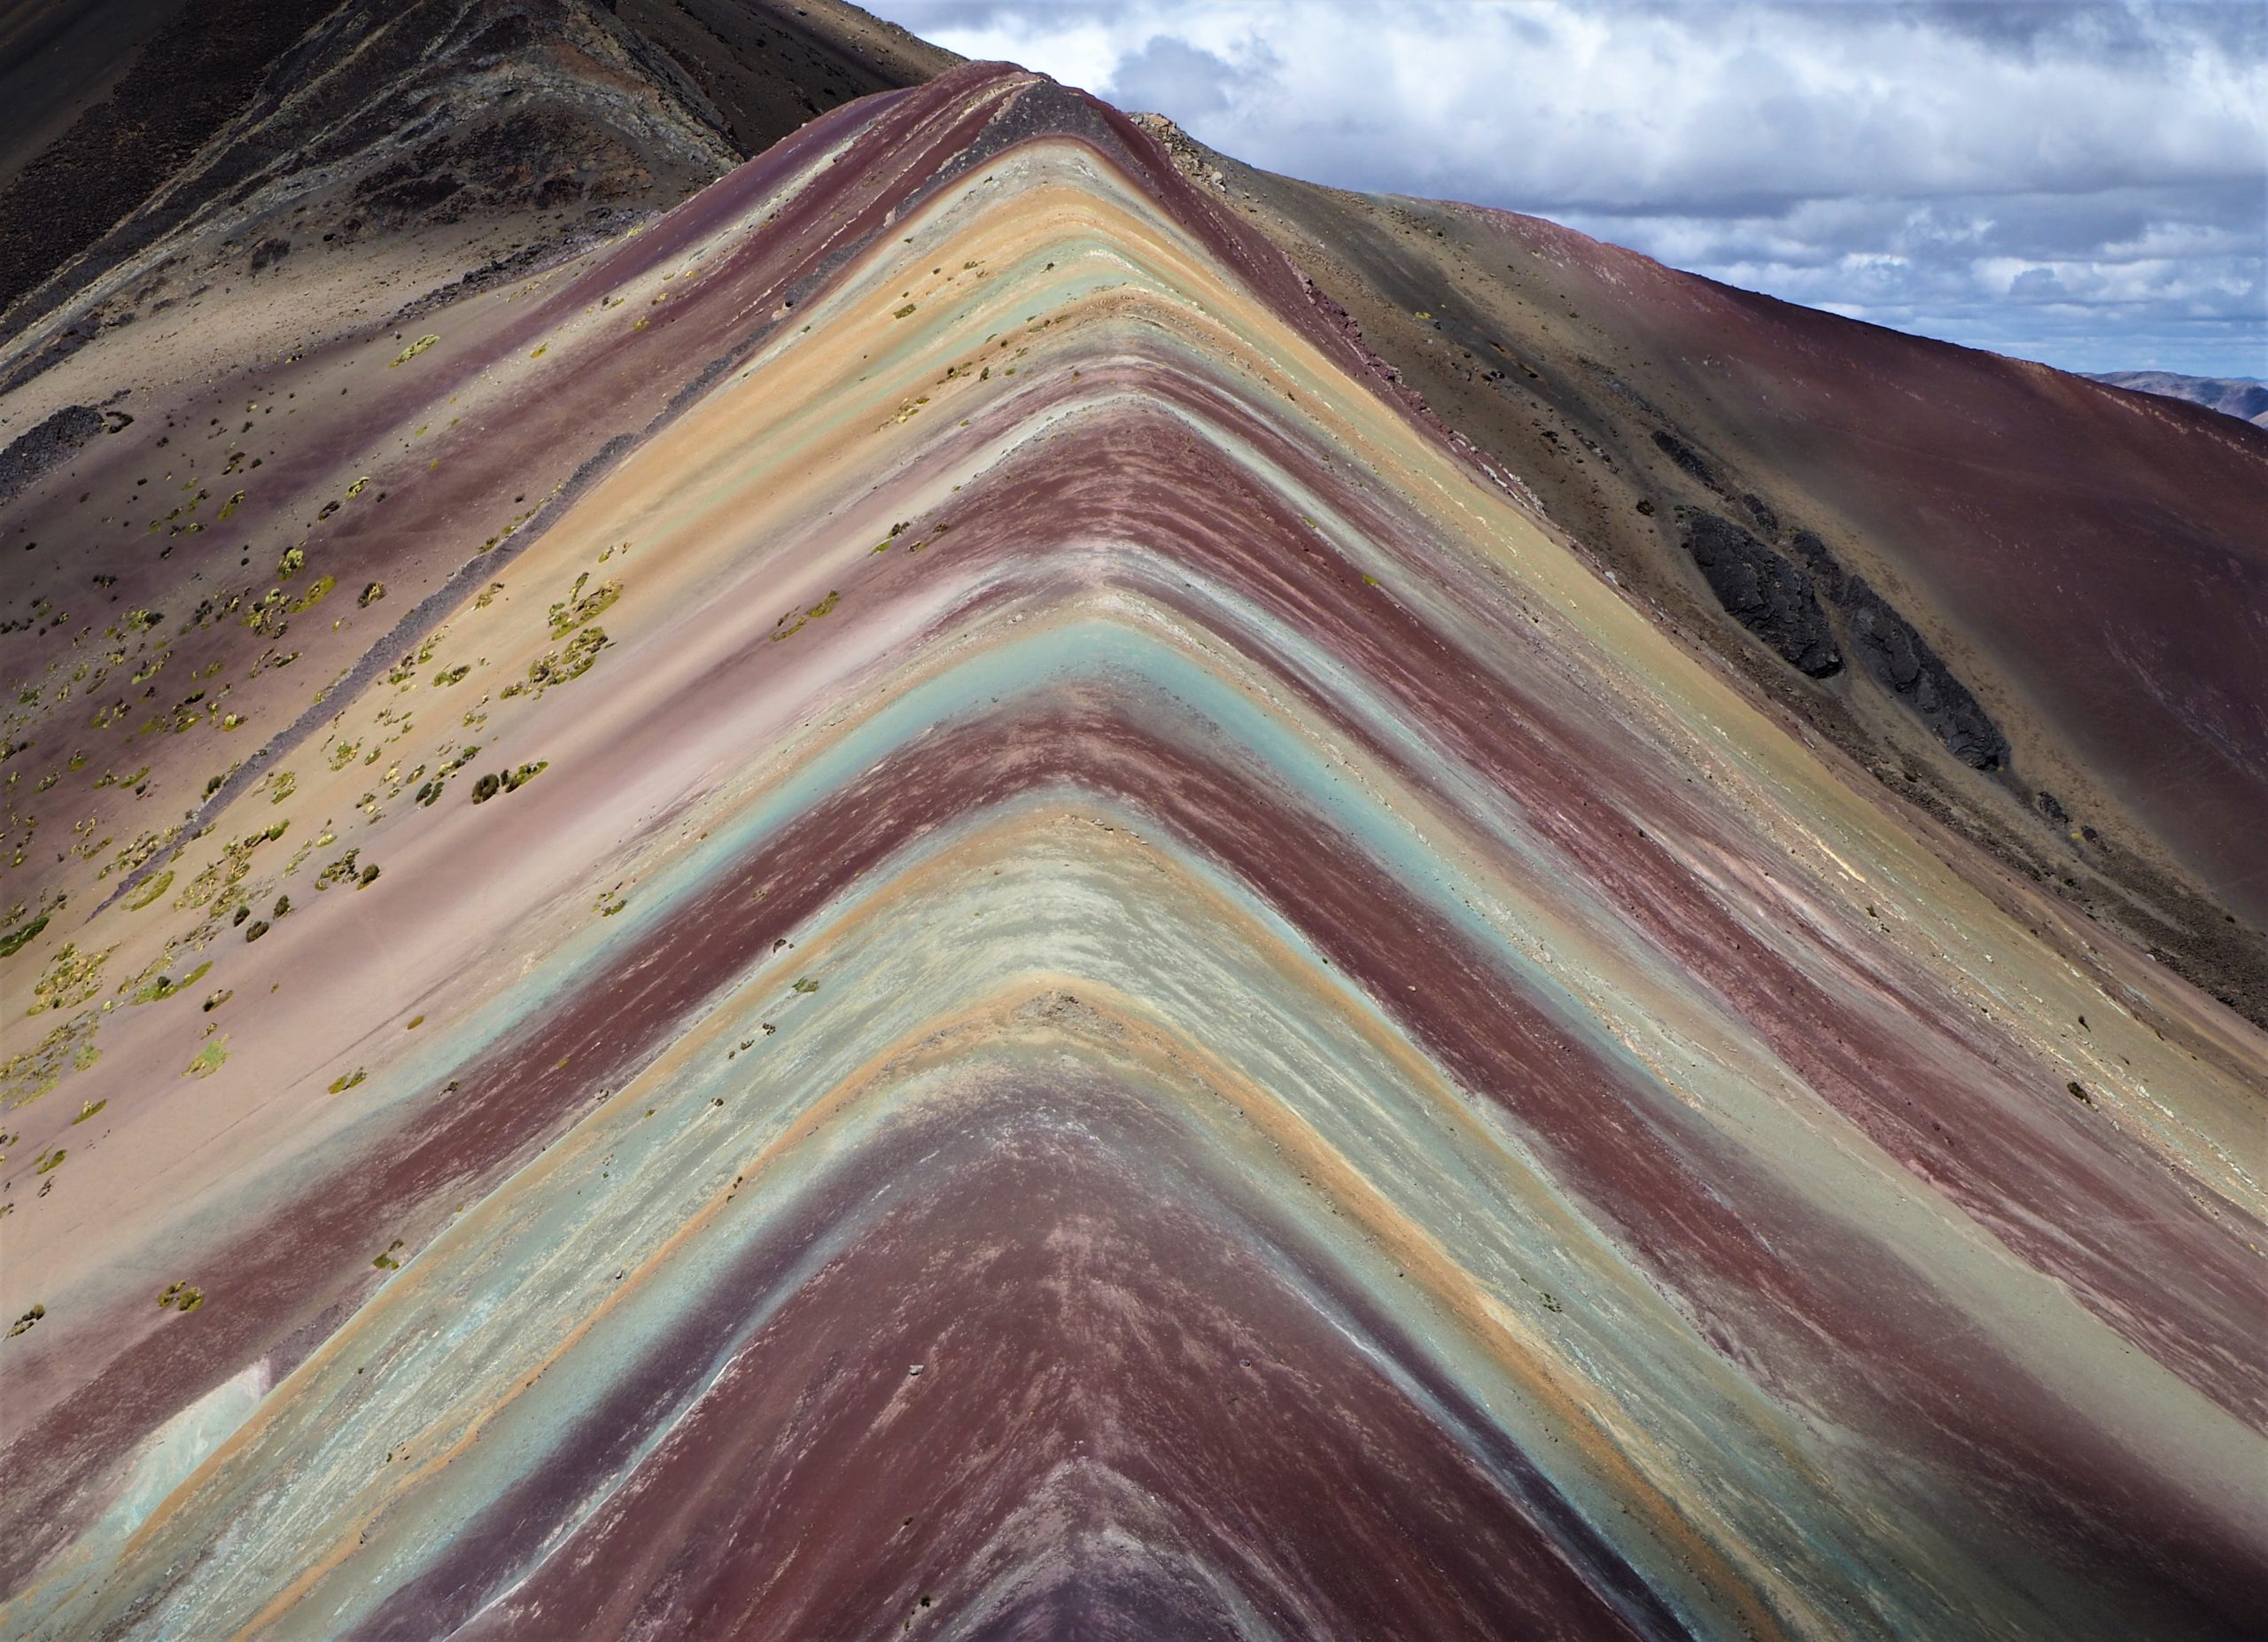
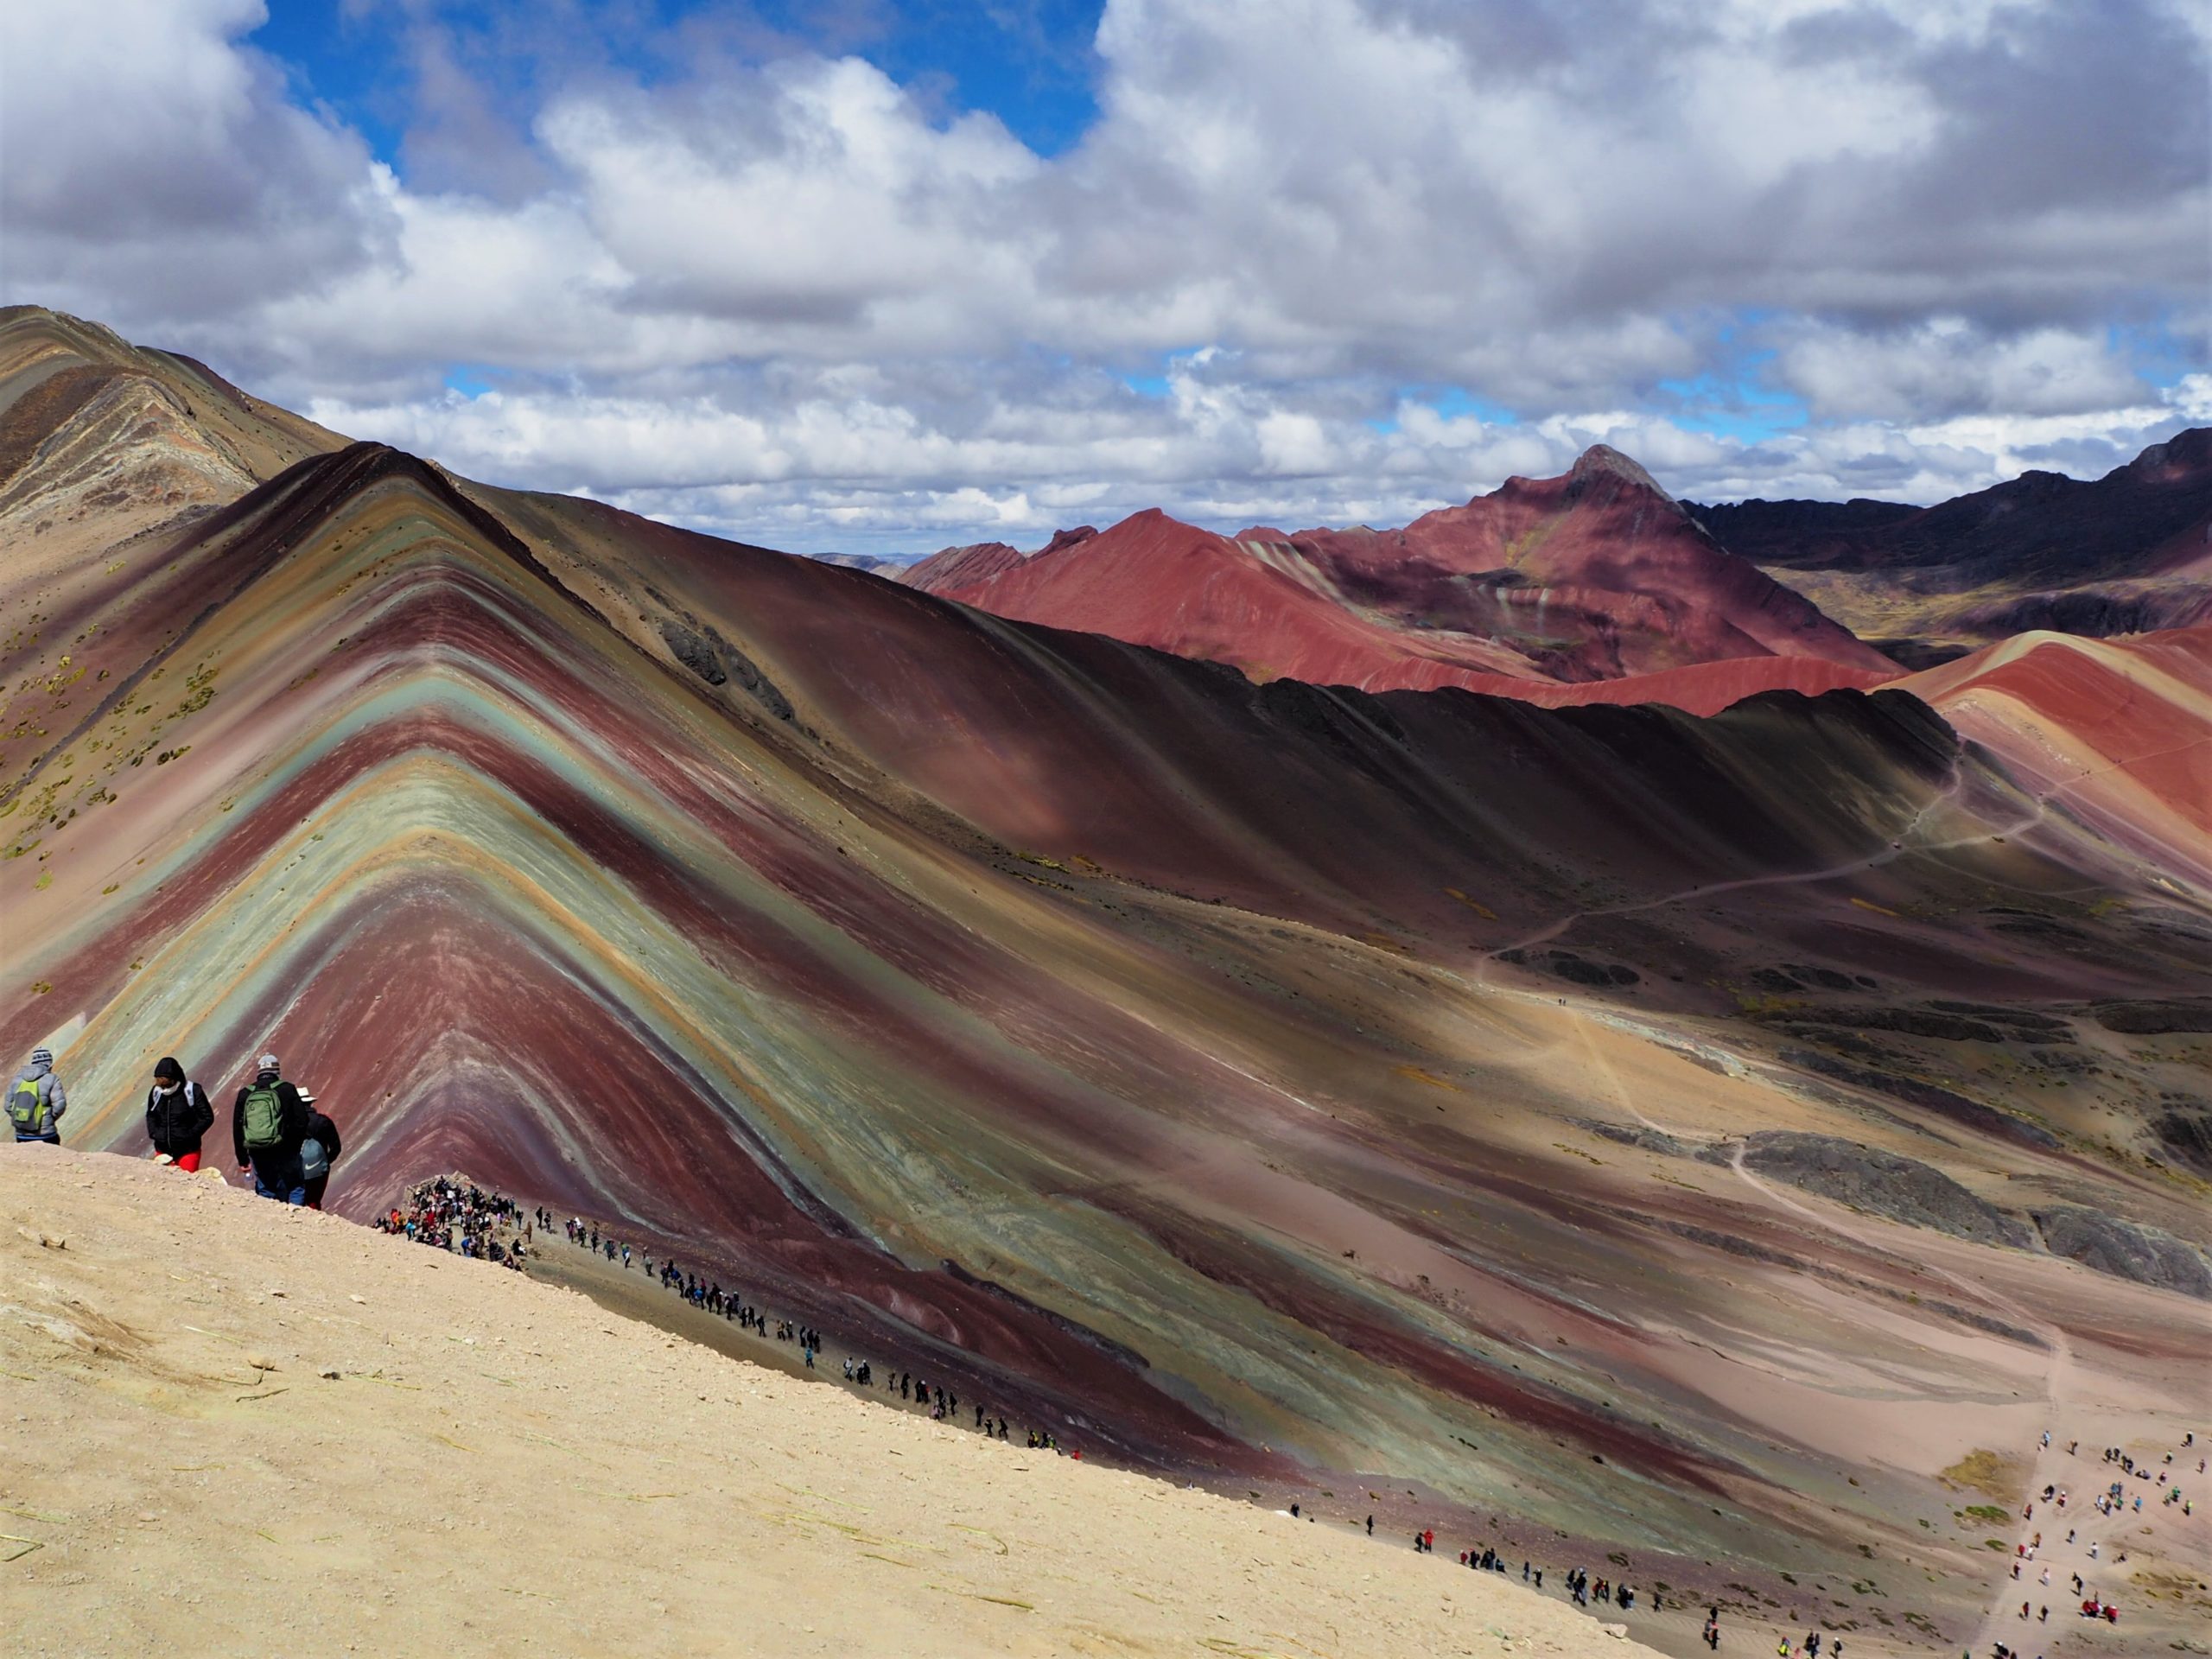
How does it really look like?
No surprise here: Instagram pictures tend to be a little over-edited. The ones from Rainbow Mountain are sometimes modified to show an extreme bizarre contrast of colours that in no way can be real. Sorry to disappoint, but that is true.
A great deal of the brightness of the colours you will be seeing will depend on the sky. If the day is clear they will shine more than with clouds or fog. We experienced both fog and clear sky, and the landscape was impressive either way. If you look at the pictures on this post you will see that some of them are darker than others: this is the effect of the clouds.
What if there is snow? Unless it’s completely covered in snow, which is no longer common, you will be able to see the famous colours. Also, the snow will only be in one side of the mountain. I think this contrast of white with the whole rainbow would be pretty cool to see.
2. How to arrive to Rainbow Mountain
Group trip
When we booked, we were able to find a very good price: 55 PEN per person. The fact that we were a group of four and were booking just the day before may have played a role. This included the transport to Rainbow Mountain, breakfast and lunch, and the afternoon visit to four nearby lagoons. It didn’t include the tickets for the Rainbow Mountain and the Red Valey, 10 PEN per person each ticket.
Usually group tours leave really early (from 2 to 4 am) unsuccessfully trying to avoid the crowds of tourists that visit Rainbow Mountain. From when they pick you up from your hotel, this is how the day will look like:
- 1.5 – 2 hours drive.
- 30 minutes breakfast stop. You will surely be encouraged to buy socks and jackets to tolerate the cold and wind up in the mountain. My advise is to come prepared from home, so that you are not tempted to buy this overpriced items. Check the section below on what you need to bring and how to dress!
- 1.5 – 2 hours drive. Arrival to Rainbow Mountain.
- 1.5 – 2 hours ascend. You can either walk or rent a horse, which is not included in the price of the tour.
- 1.5 hours to be at the viewpoint, possible side visit to Red Valley and descend to the parking lot.
- 1.5 – 2 hours drive. Lunch stop.
- Return to Cusco or visit to the four lagoons, depending on the tour you booked.
Some tips to book the right group tour
- Do not book the tour from home. It will only increase the cost as you will probably need to pay for an additional intermediary and for the credit card commission.
- There are a thousand million travel agencies available in each city in Peru, particularly in Cusco, and all of them can organise your tour. Invest a little time in exploring the conditions in a few of them, ask all the questions you may have and book with the one that convinces you the most.
- Don’t be afraid to not find a place. You will! A lot of groups leave each day. Also, they can operate on short notice, so even if you book late in the afternoon you would be able to leave the very next morning.
On your own
While we were doing research we found that it was possible to visit Rainbow Mountain on your own. This is second hand information as we never did it:
- Bus from Cusco to Checacupe. 8 PEN per person one way. 2 hours drive.
- Taxi from Checacupe to Rainbow Mountain. 100-120 PEN round trip, with the taxi driver waiting for you. This price would be acceptable or outrageous depending on how many people you share it with. 2 hours drive.
- Bus from Checacupe to Cusco. 8 PEN per person one way. 2 hours drive.

I can truly say that there is nothing we despise more than an organised group trip. Spending the whole day in the minibus, driving endlessly from picture spot to picture spot. Stopping for ten minutes in each spot. Having lunch in expensive restaurants because you don’t have a choice.
However, this one group trip was not that bad, as we had plenty of time to enjoy ourselves. Also, considering that the cost (55 PEN, including meals) was lower than if we had gone on our own, in this case I would recommend you to skip the trouble and go with a group.
3. The experience
The ascend to Rainbow Mountain
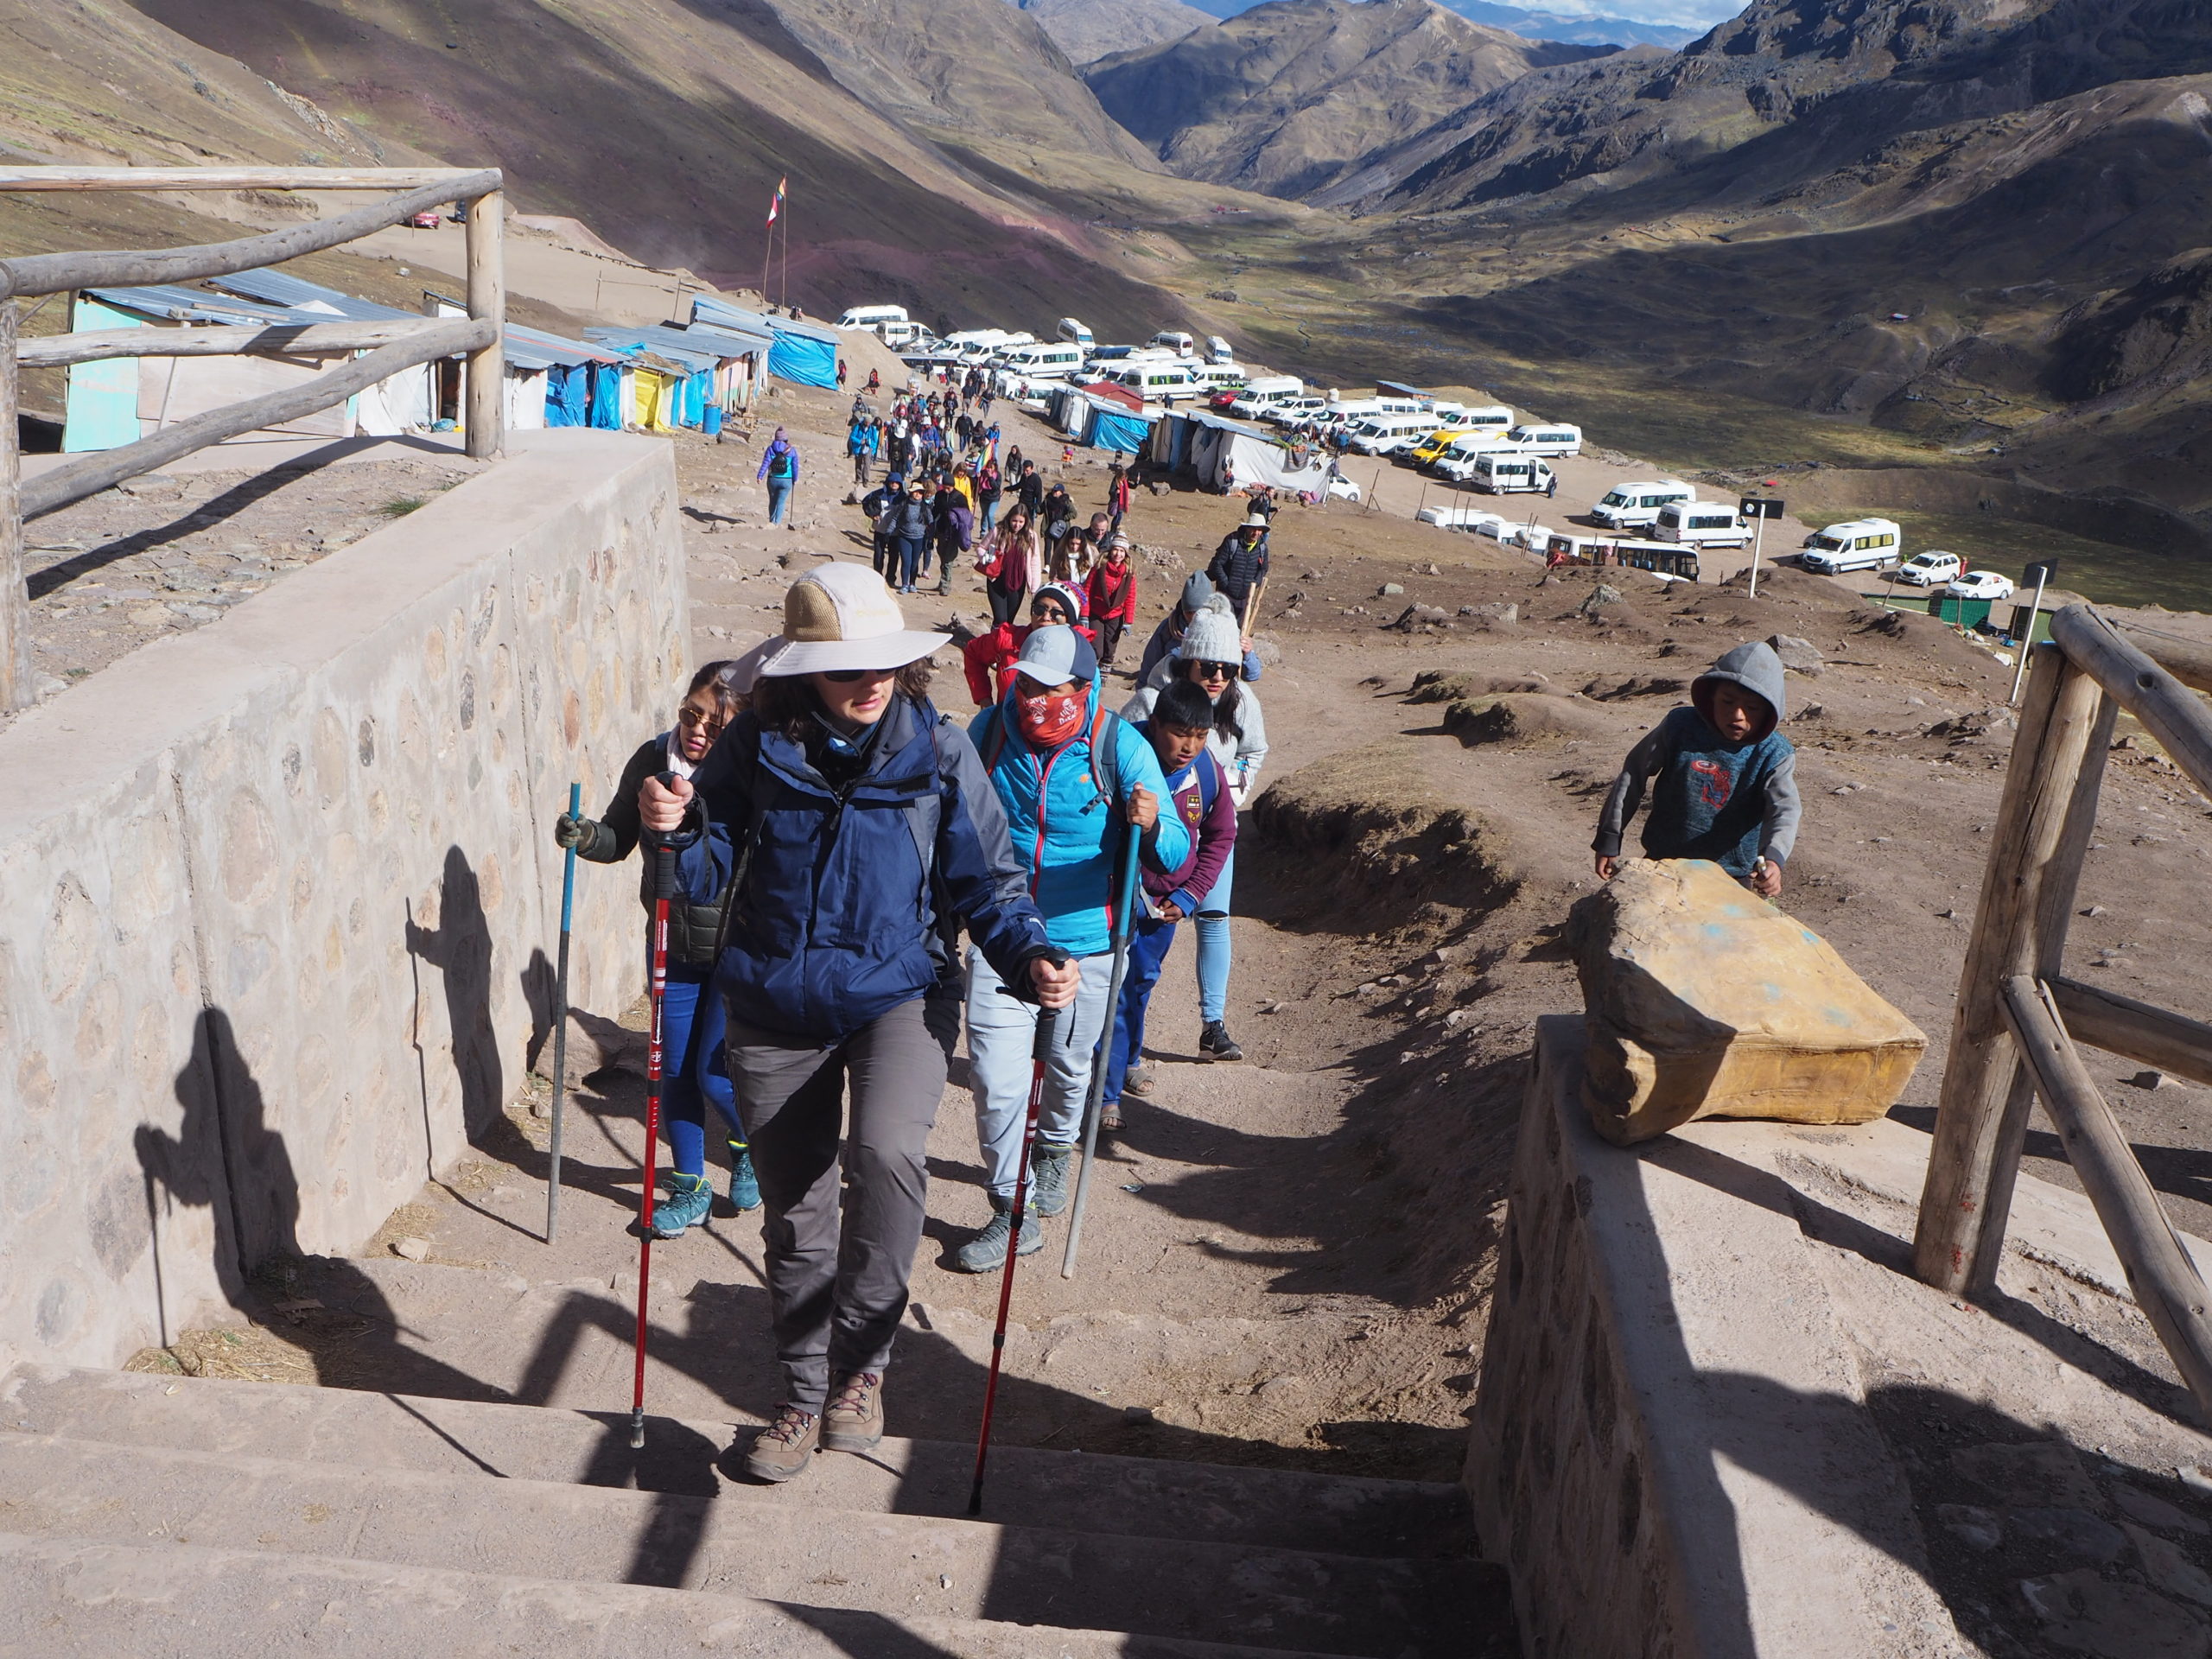
The group tour or taxi will leave you at the parking lot from where you will start the hike. At the beginning of it, you will need to pay for the entry ticket to Rainbow Mountain (10 PEN per person). You will also find bathrooms there which you can use for 1 PEN.
If you are in a group tour, the guides will hike with you, both to Rainbow Mountain and to Red Valley. However, as everyone’s pace is so different, you can absolutely go on your own if this is what you want.
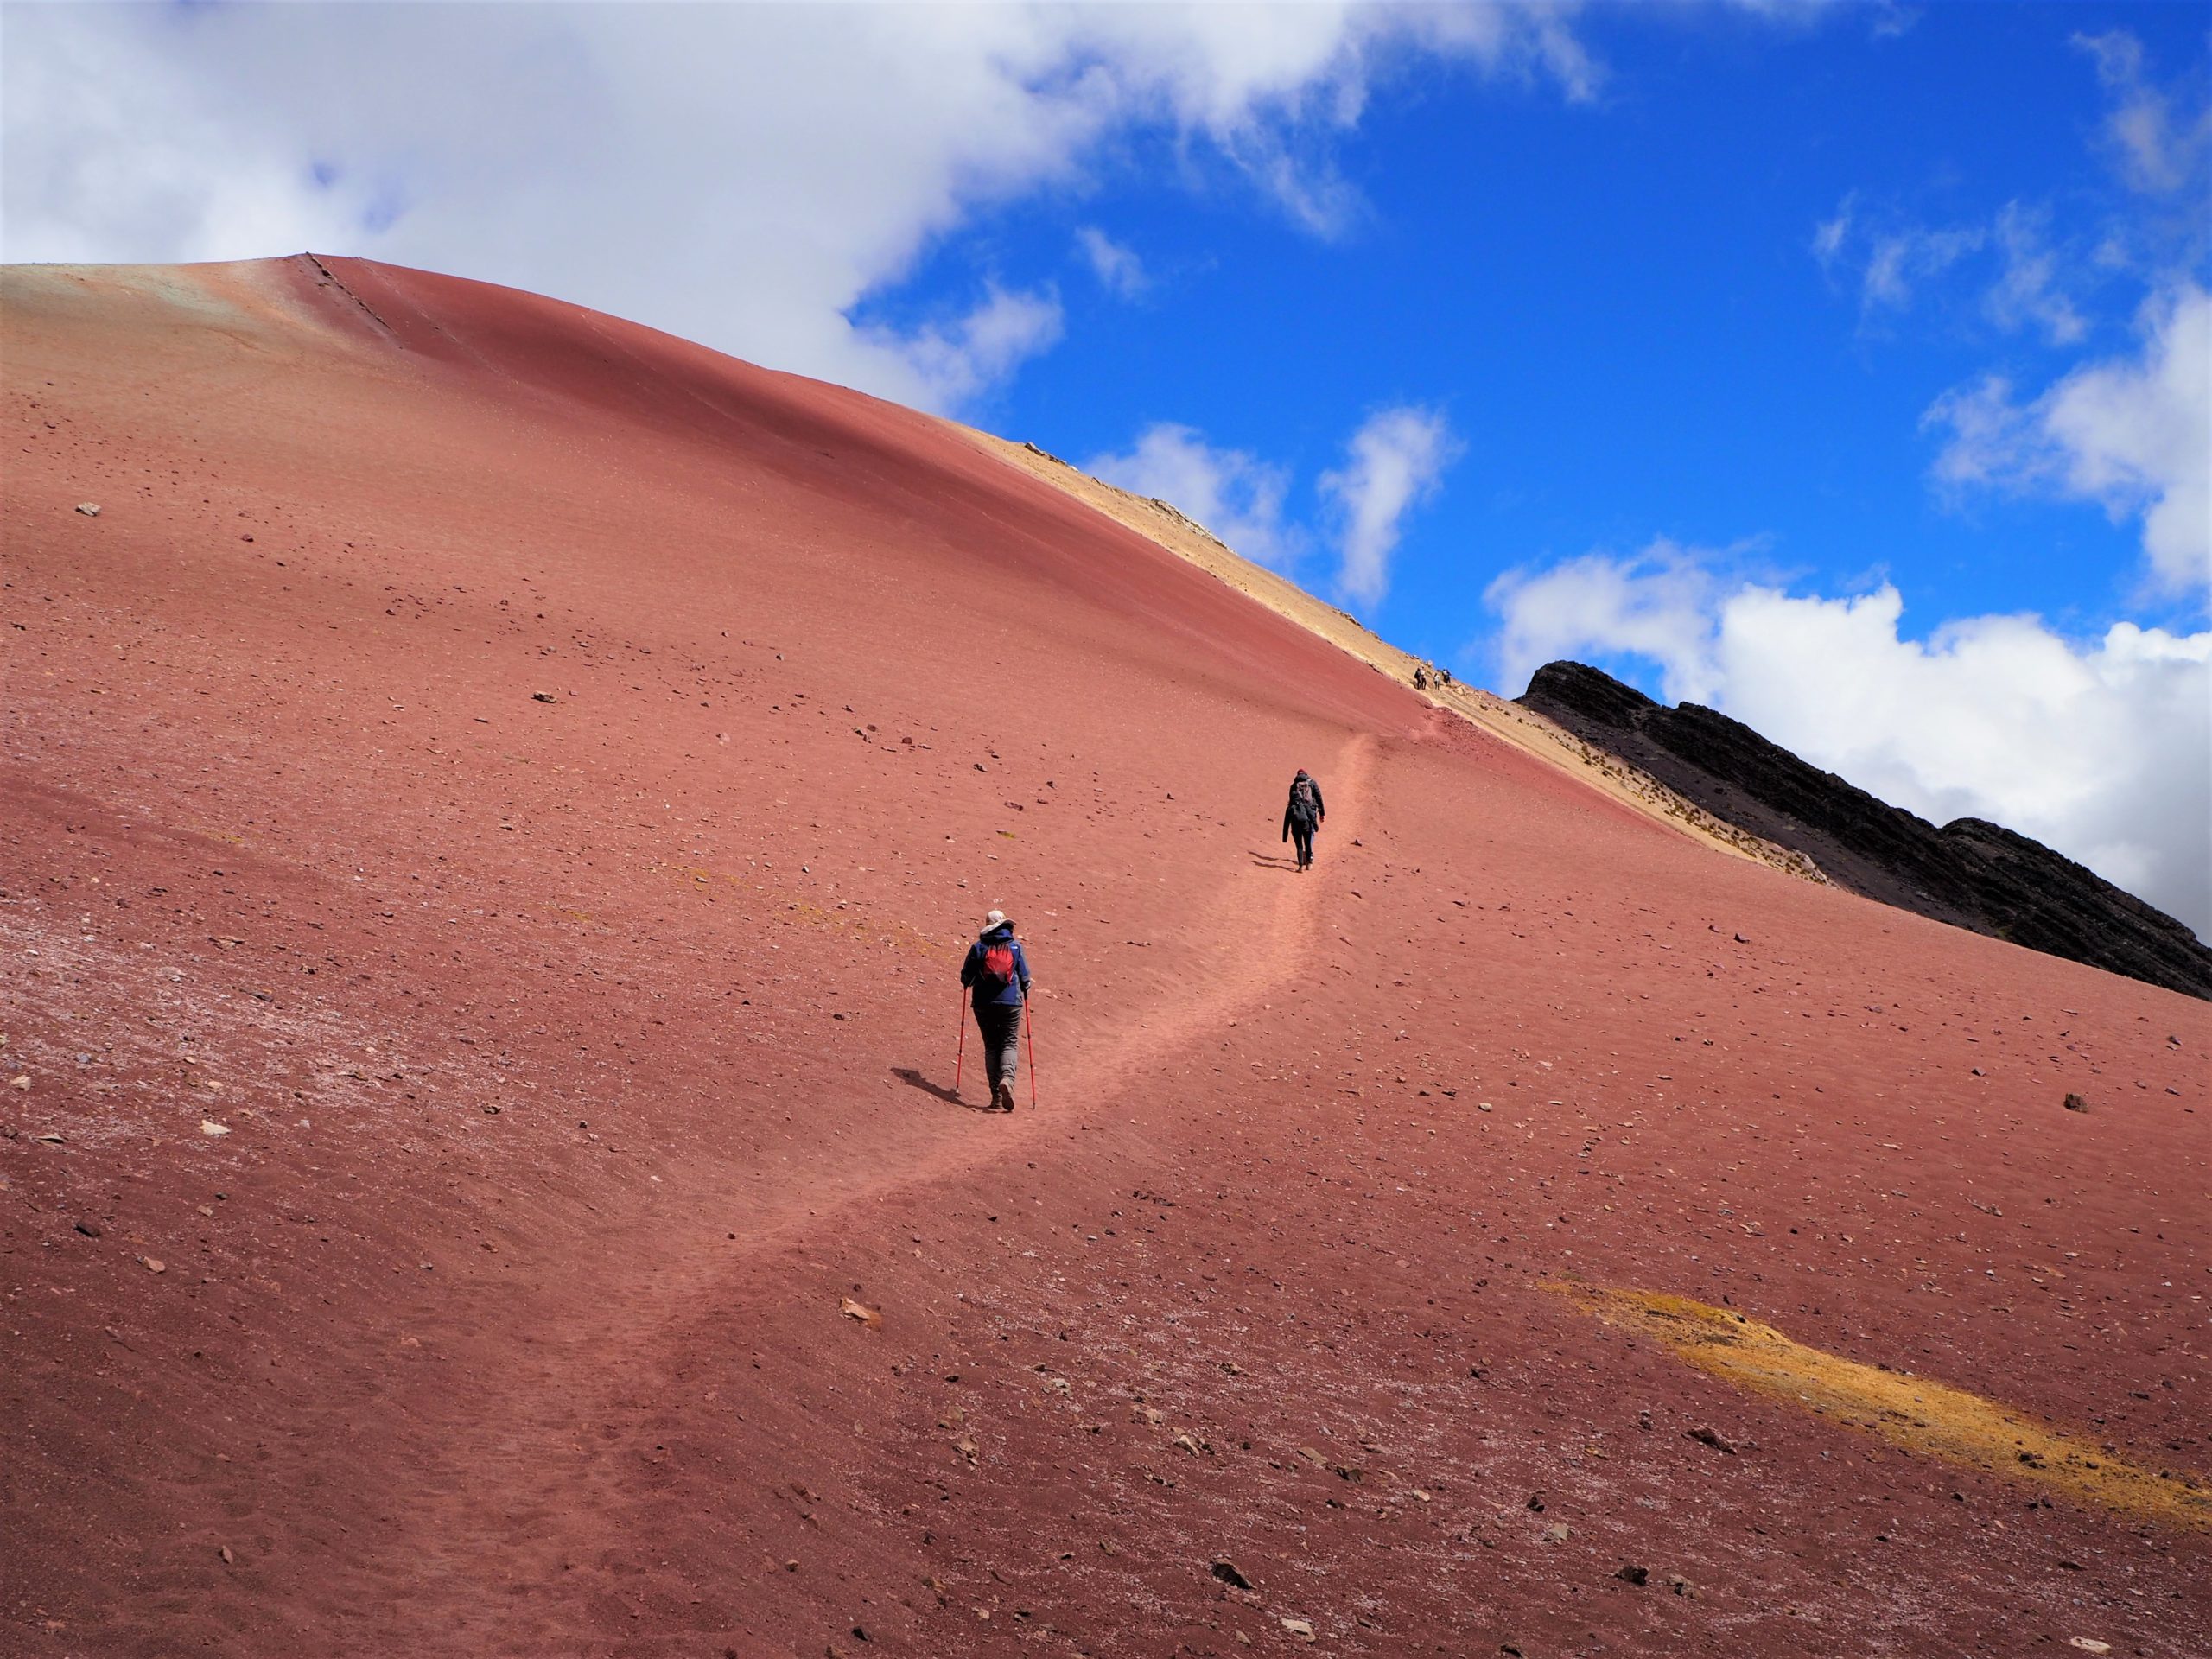
Walking
The hike per se is short an easy. 5 km / 3 mi (one way), with an elevation gain of approximately 600 m / 2,000 ft. It generally takes 1.5 – 2 hours from the parking lot to the viewpoint, depending on the level of fitness. However, the main difficulty is the high altitude (something you need to take really seriously). Read below “Difficulty of hiking to Rainbow Mountain” for information on this.
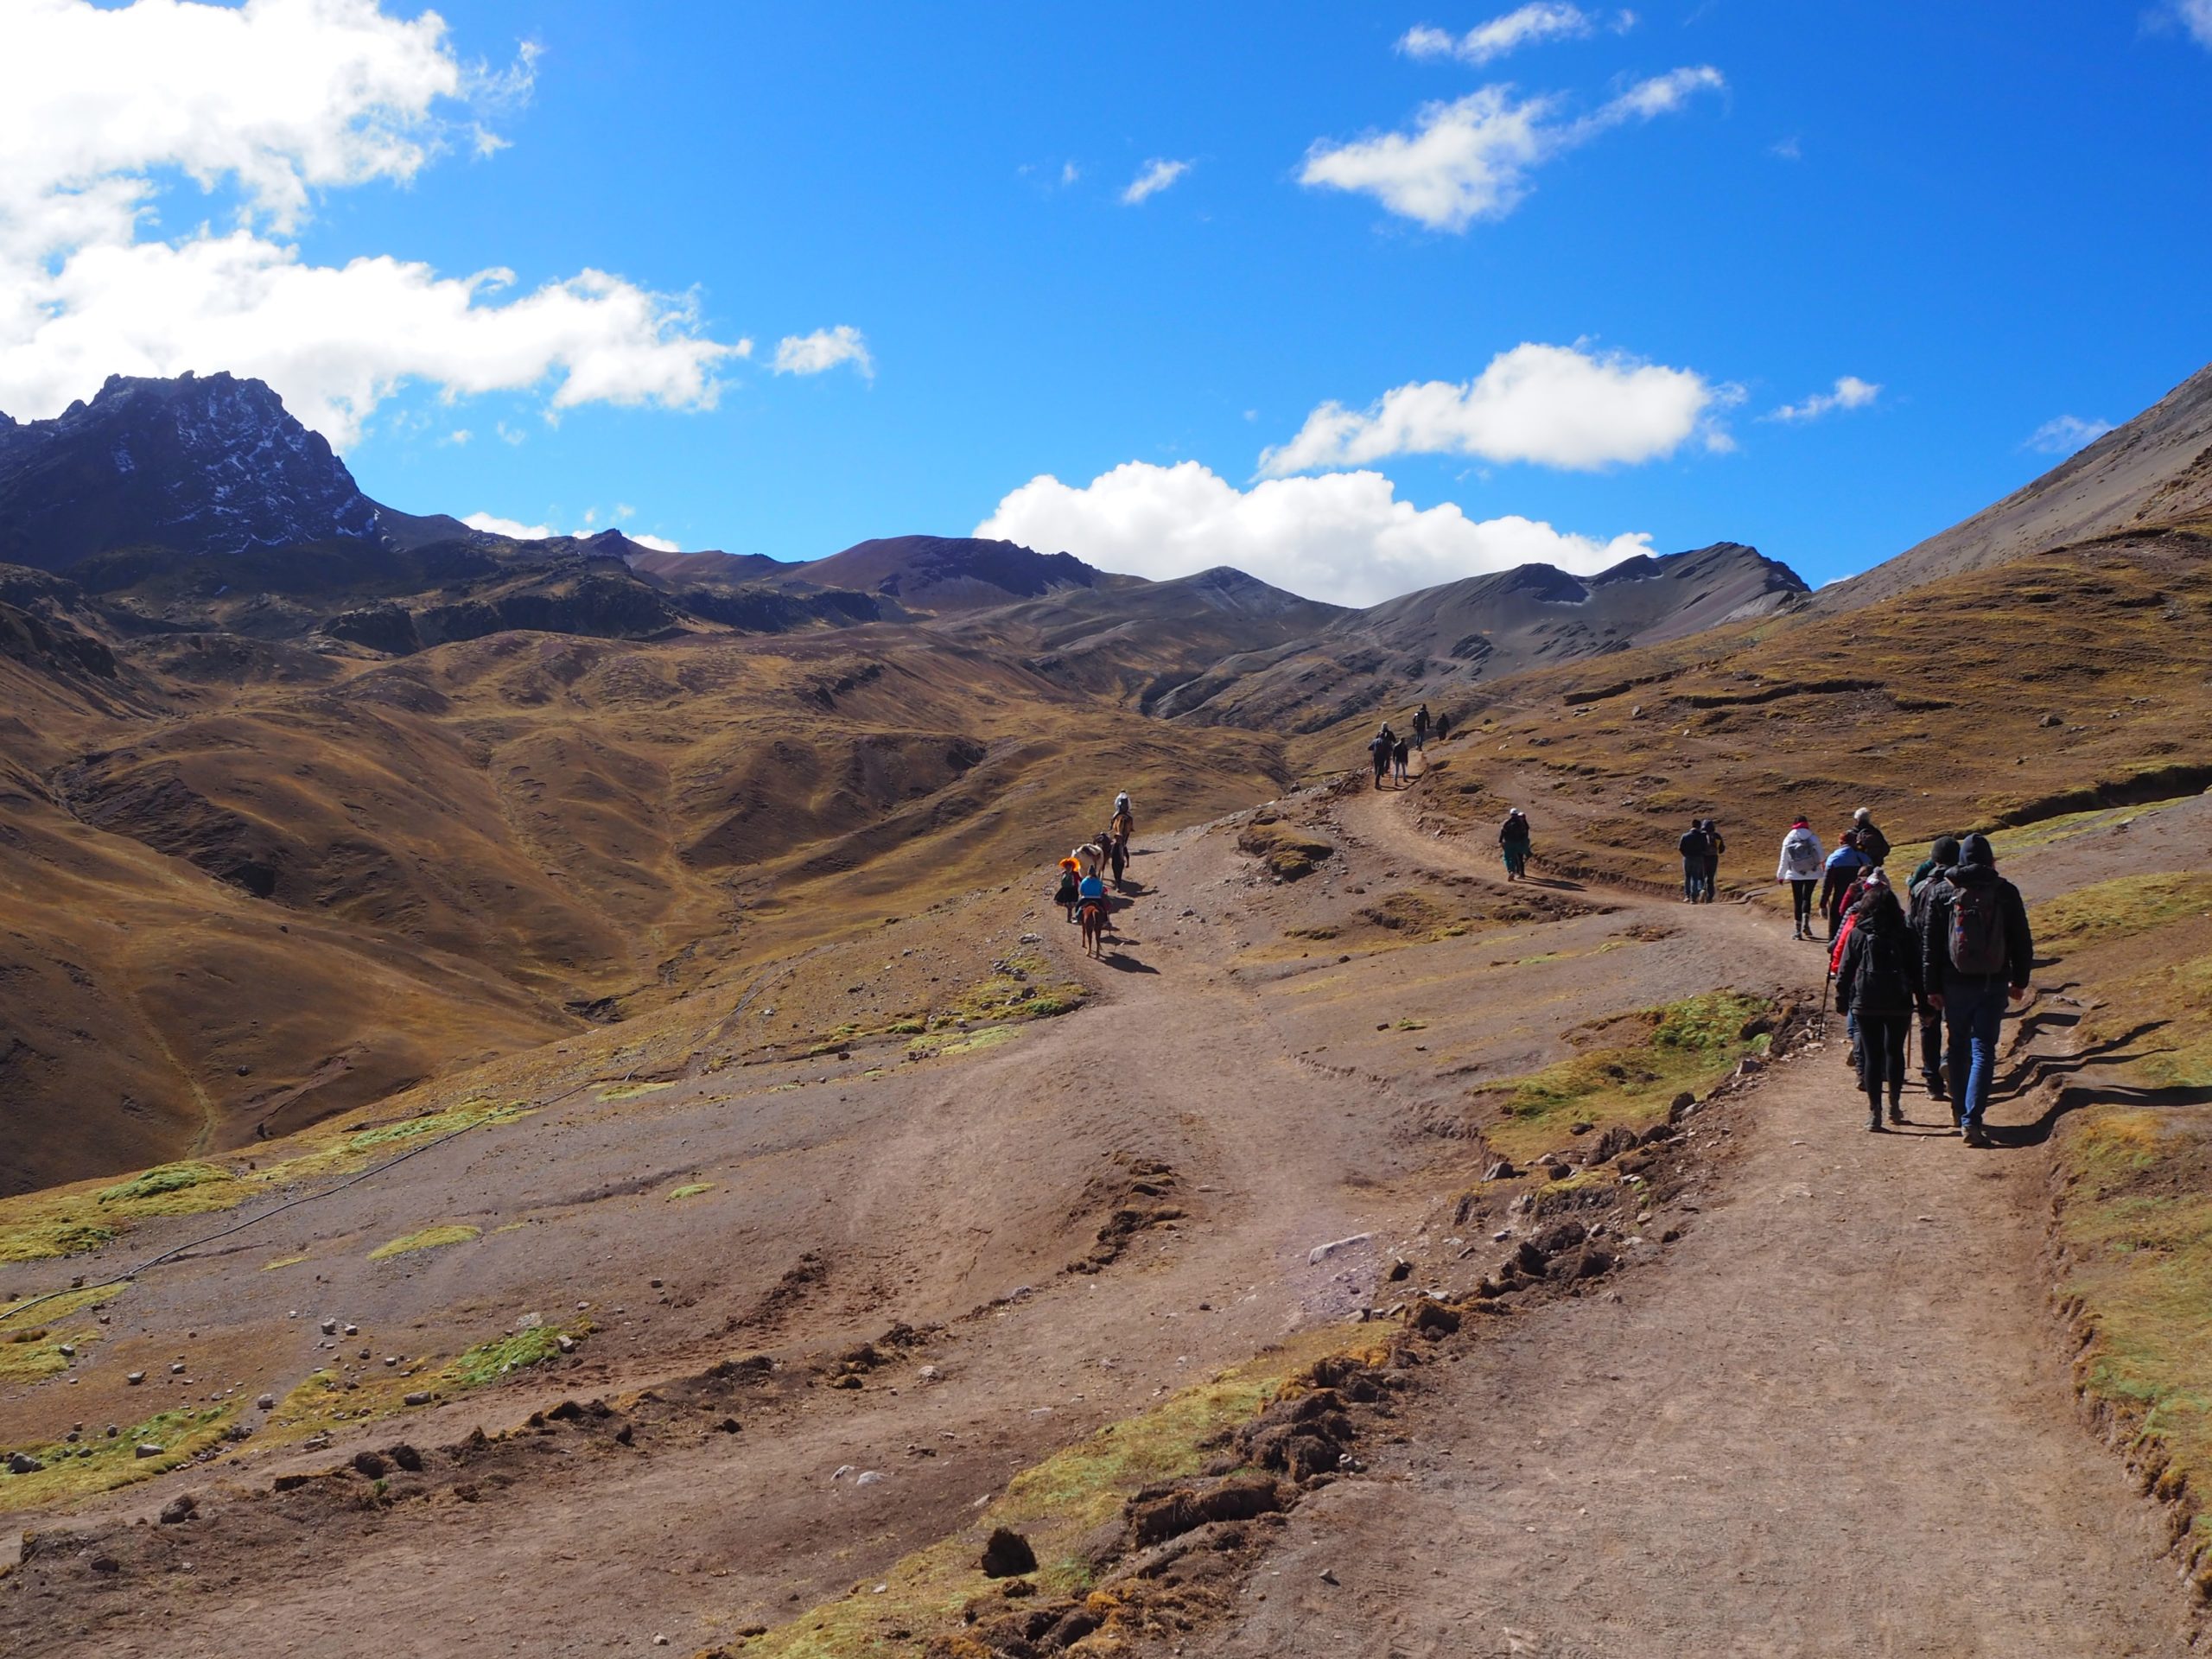
- The ascend is short.
- The elevation gain is not extreme. Most of the hike is mildly ascending and easy. Only the last 15 minutes are more demanding and challenging, but it’s so short!
- The trail is easy to follow, meaning that it’s impossible for you to get lost. The terrain is not challenging at all.
- The descend is considerably easier, in approximately 1 hour you would be at the parking lot.
We were very scared of altitude sickness and that is one of the main reasons we almost didn’t visit Rainbow Mountain. However, we only experienced mild symptoms that started when we had been in the viewpoint for a while. It is worth saying that we were very prepared for high altitude: we had spent two days in Lake Titicaca (3,800 m / 12,500 ft), three days in Cusco (3,399 m / 11,200 ft) and five days in the high altitude of the Salkantay Trek.
Other fellow hikers that were visiting Rainbow Mountain that same day did not have such a pleasant experience. A fair amount of them were constantly stopping (which is absolutely fine), hired a horse or even didn’t complete the ascend. So, the lesson here might be to prepare previously for walking in high altitude!
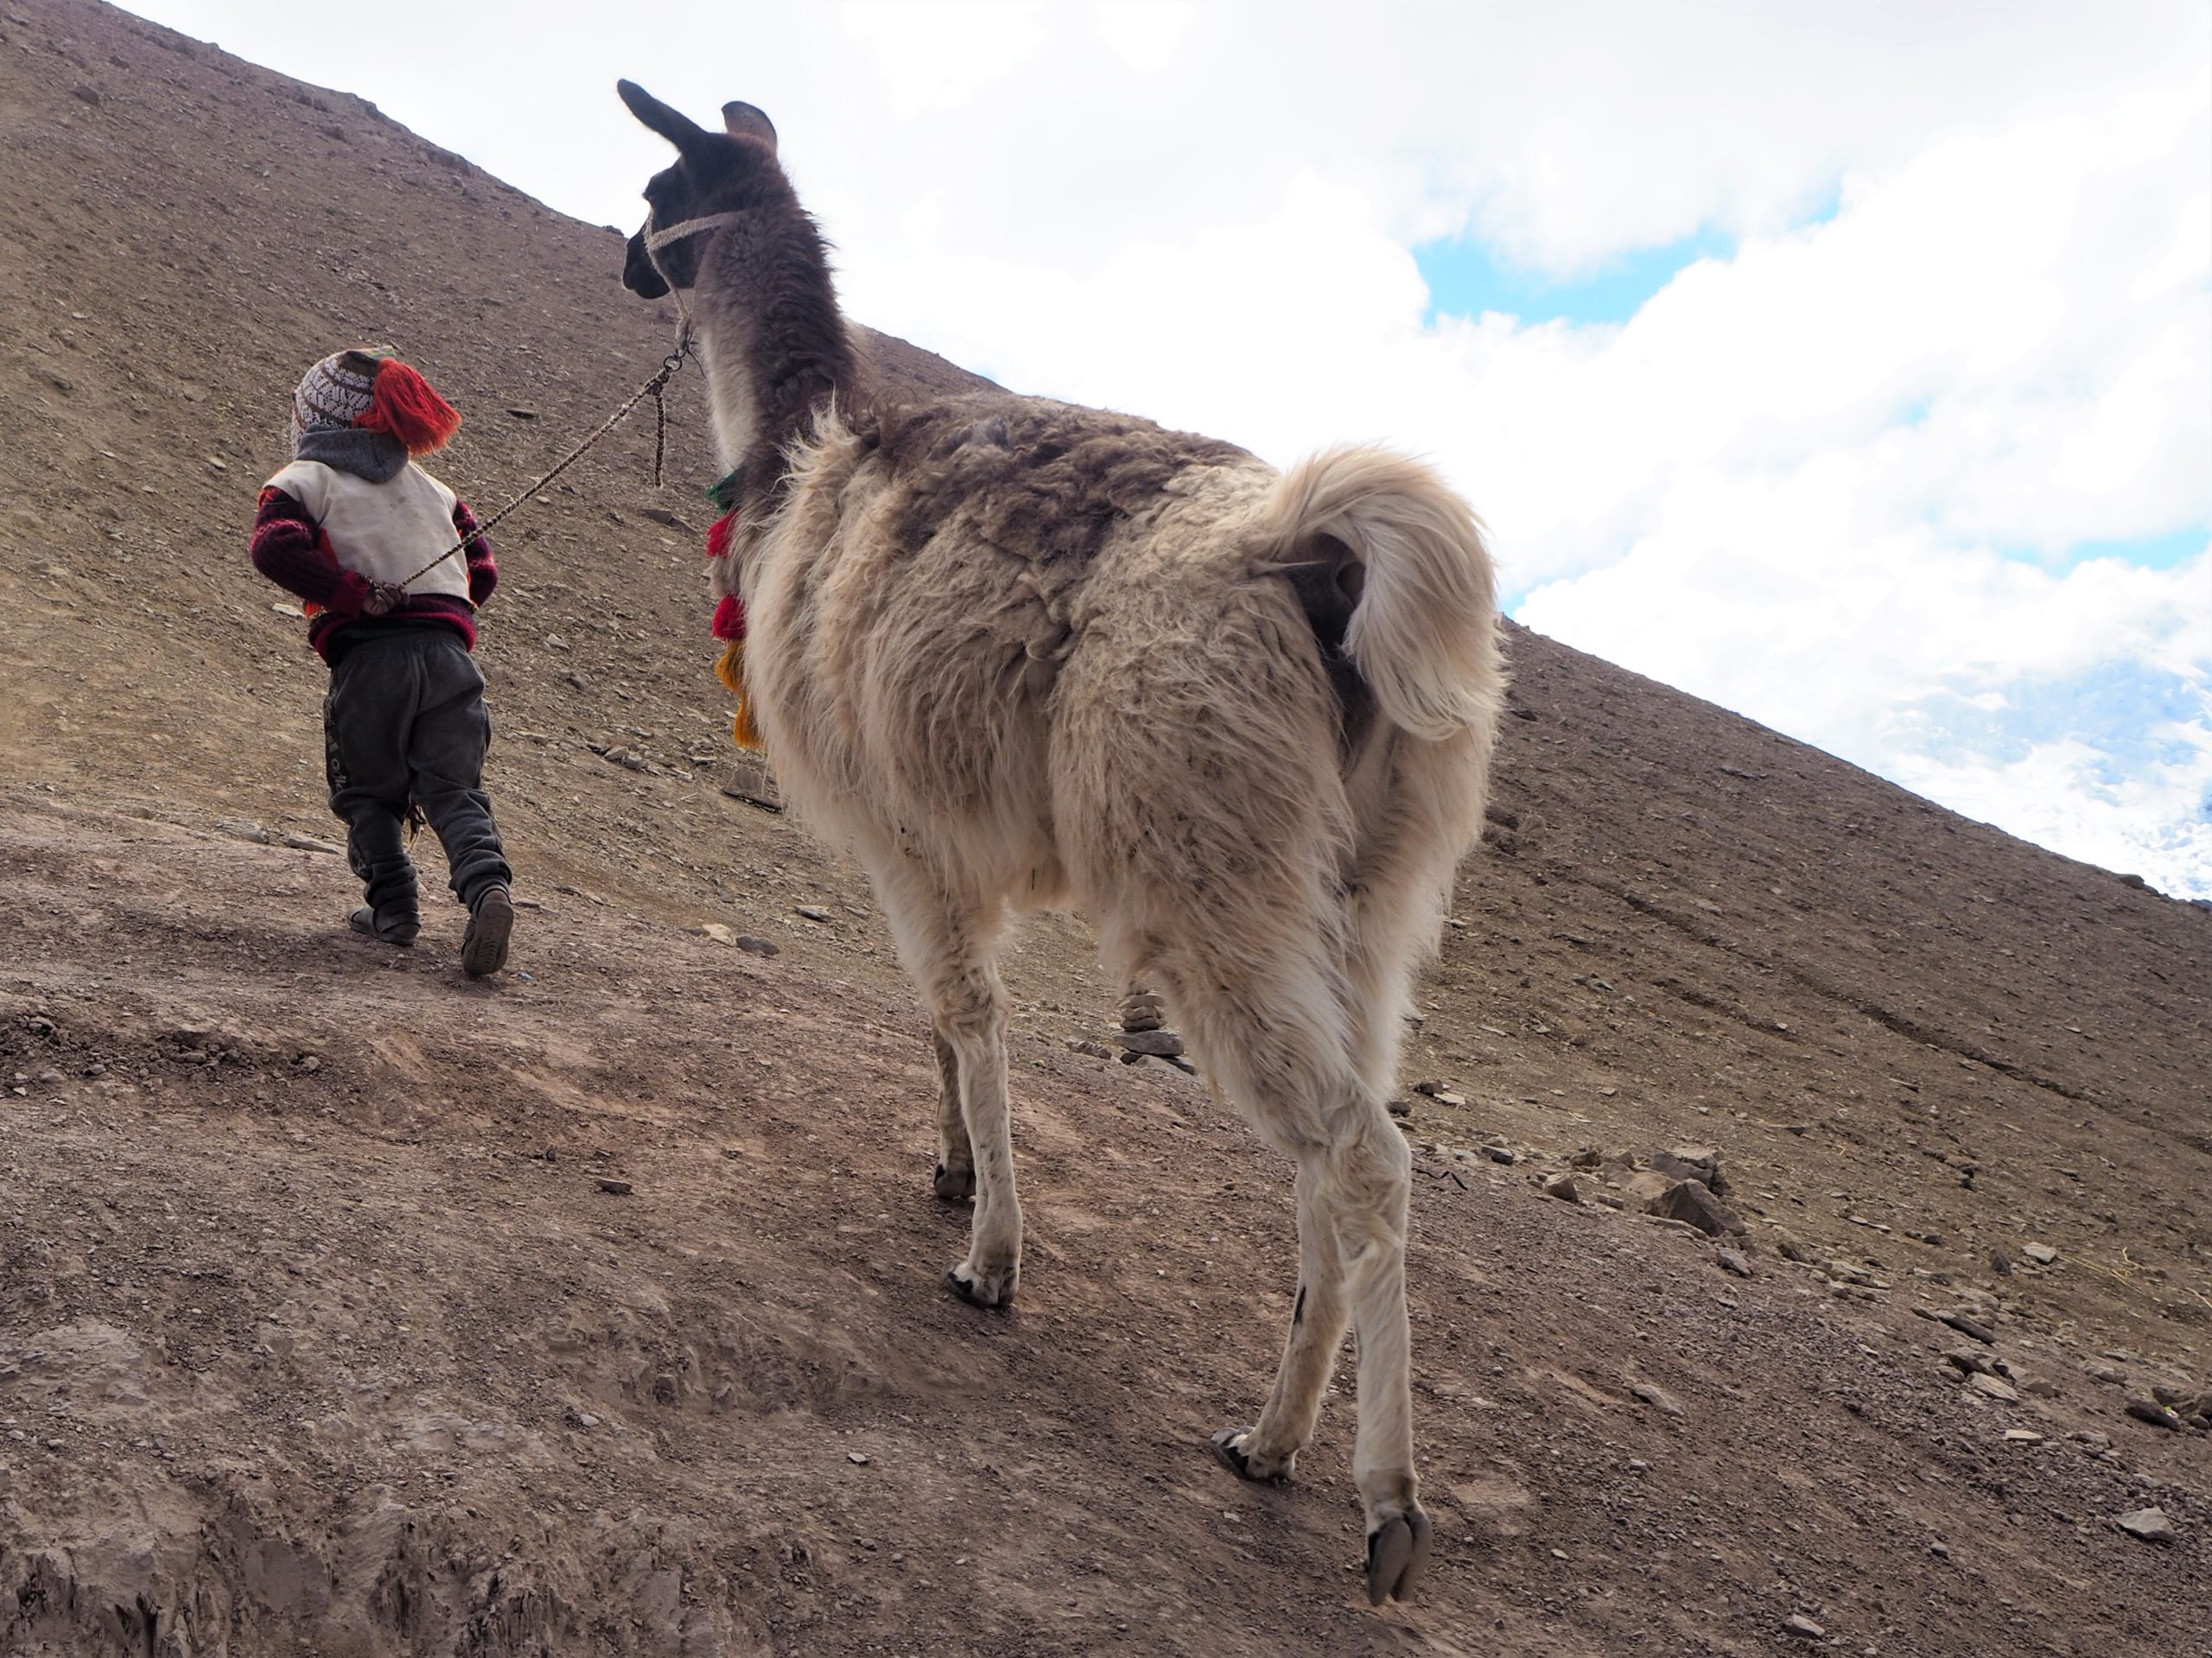
By horse
You can also do the ascend (and descend) by horse instead of walking. This will cost approximately 60 PEN on the way up and 40 PEN down. It will be possible for you to hire a horse during the whole ascend, not only at the beginning. However, it is not possible to arrive to the top by horse: you will need to walk for the last 15 minutes. These are the more challenging.

Regarding the horse, this is a very controversial and important topic, as usually when animals are used for tourism they are exploited and not treated well at all. So please, consider hiring a horse only as a last resource. Also, be sure that the animal is in good conditions and well-cared for.
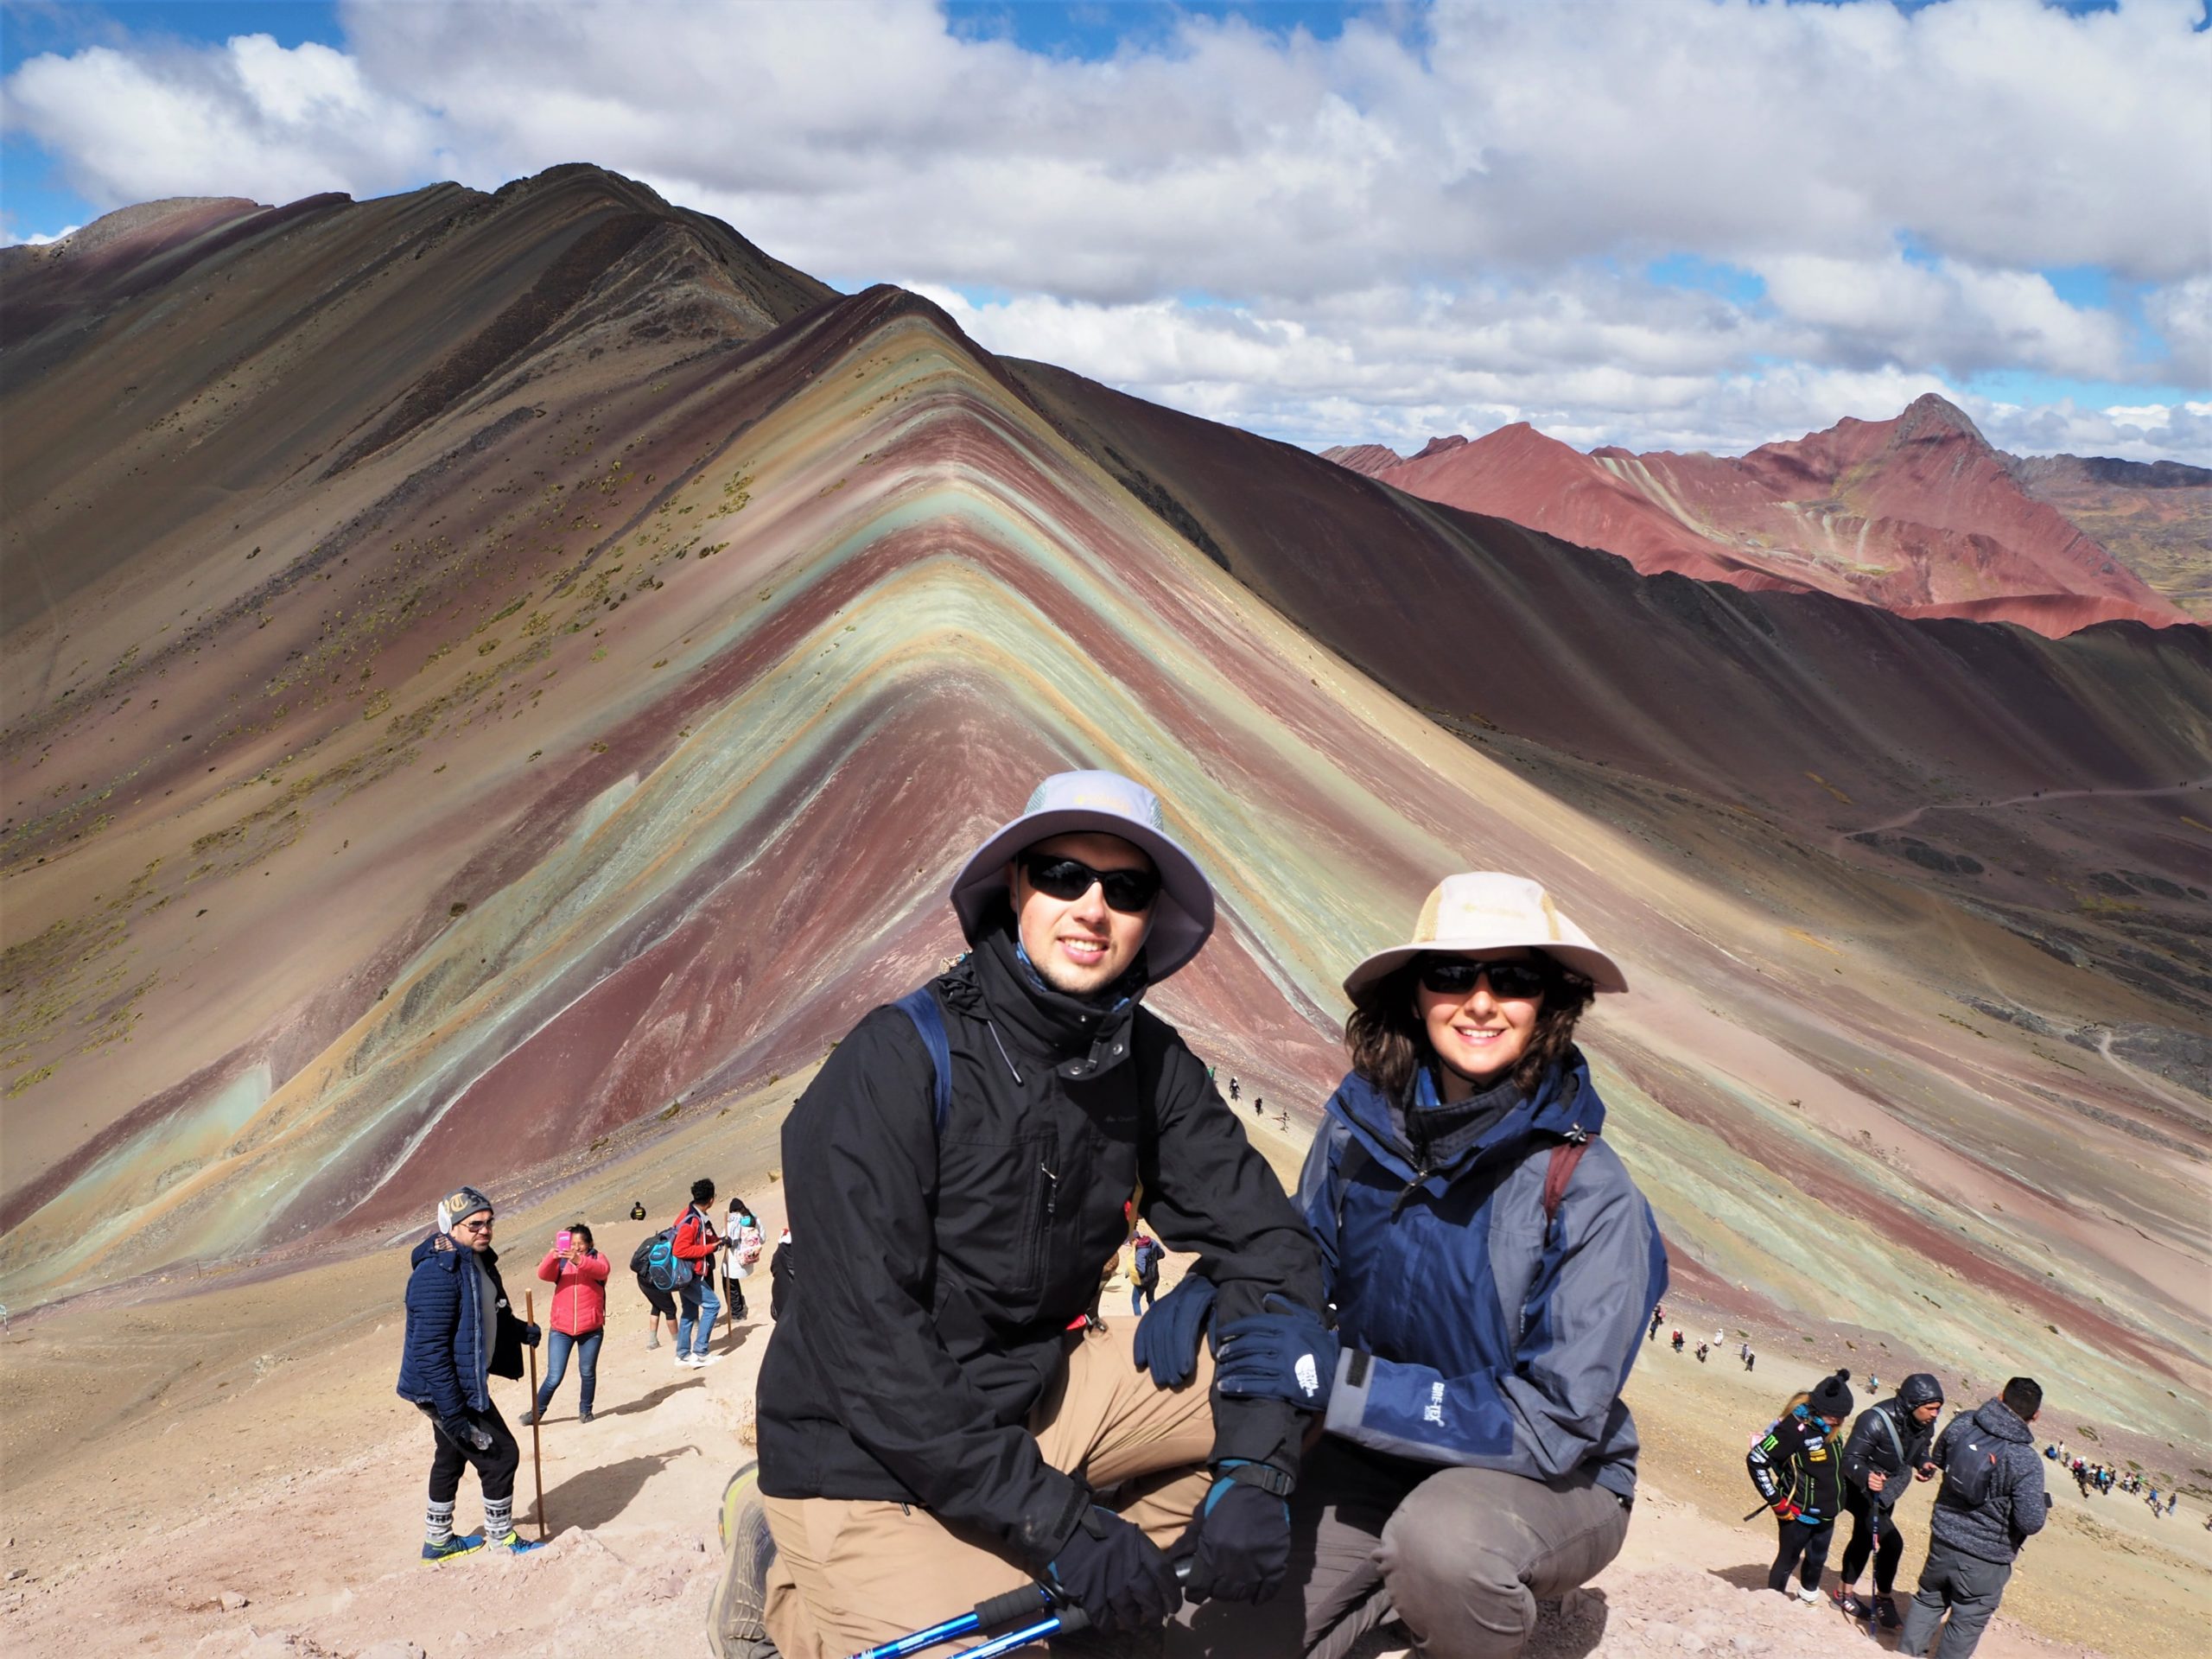
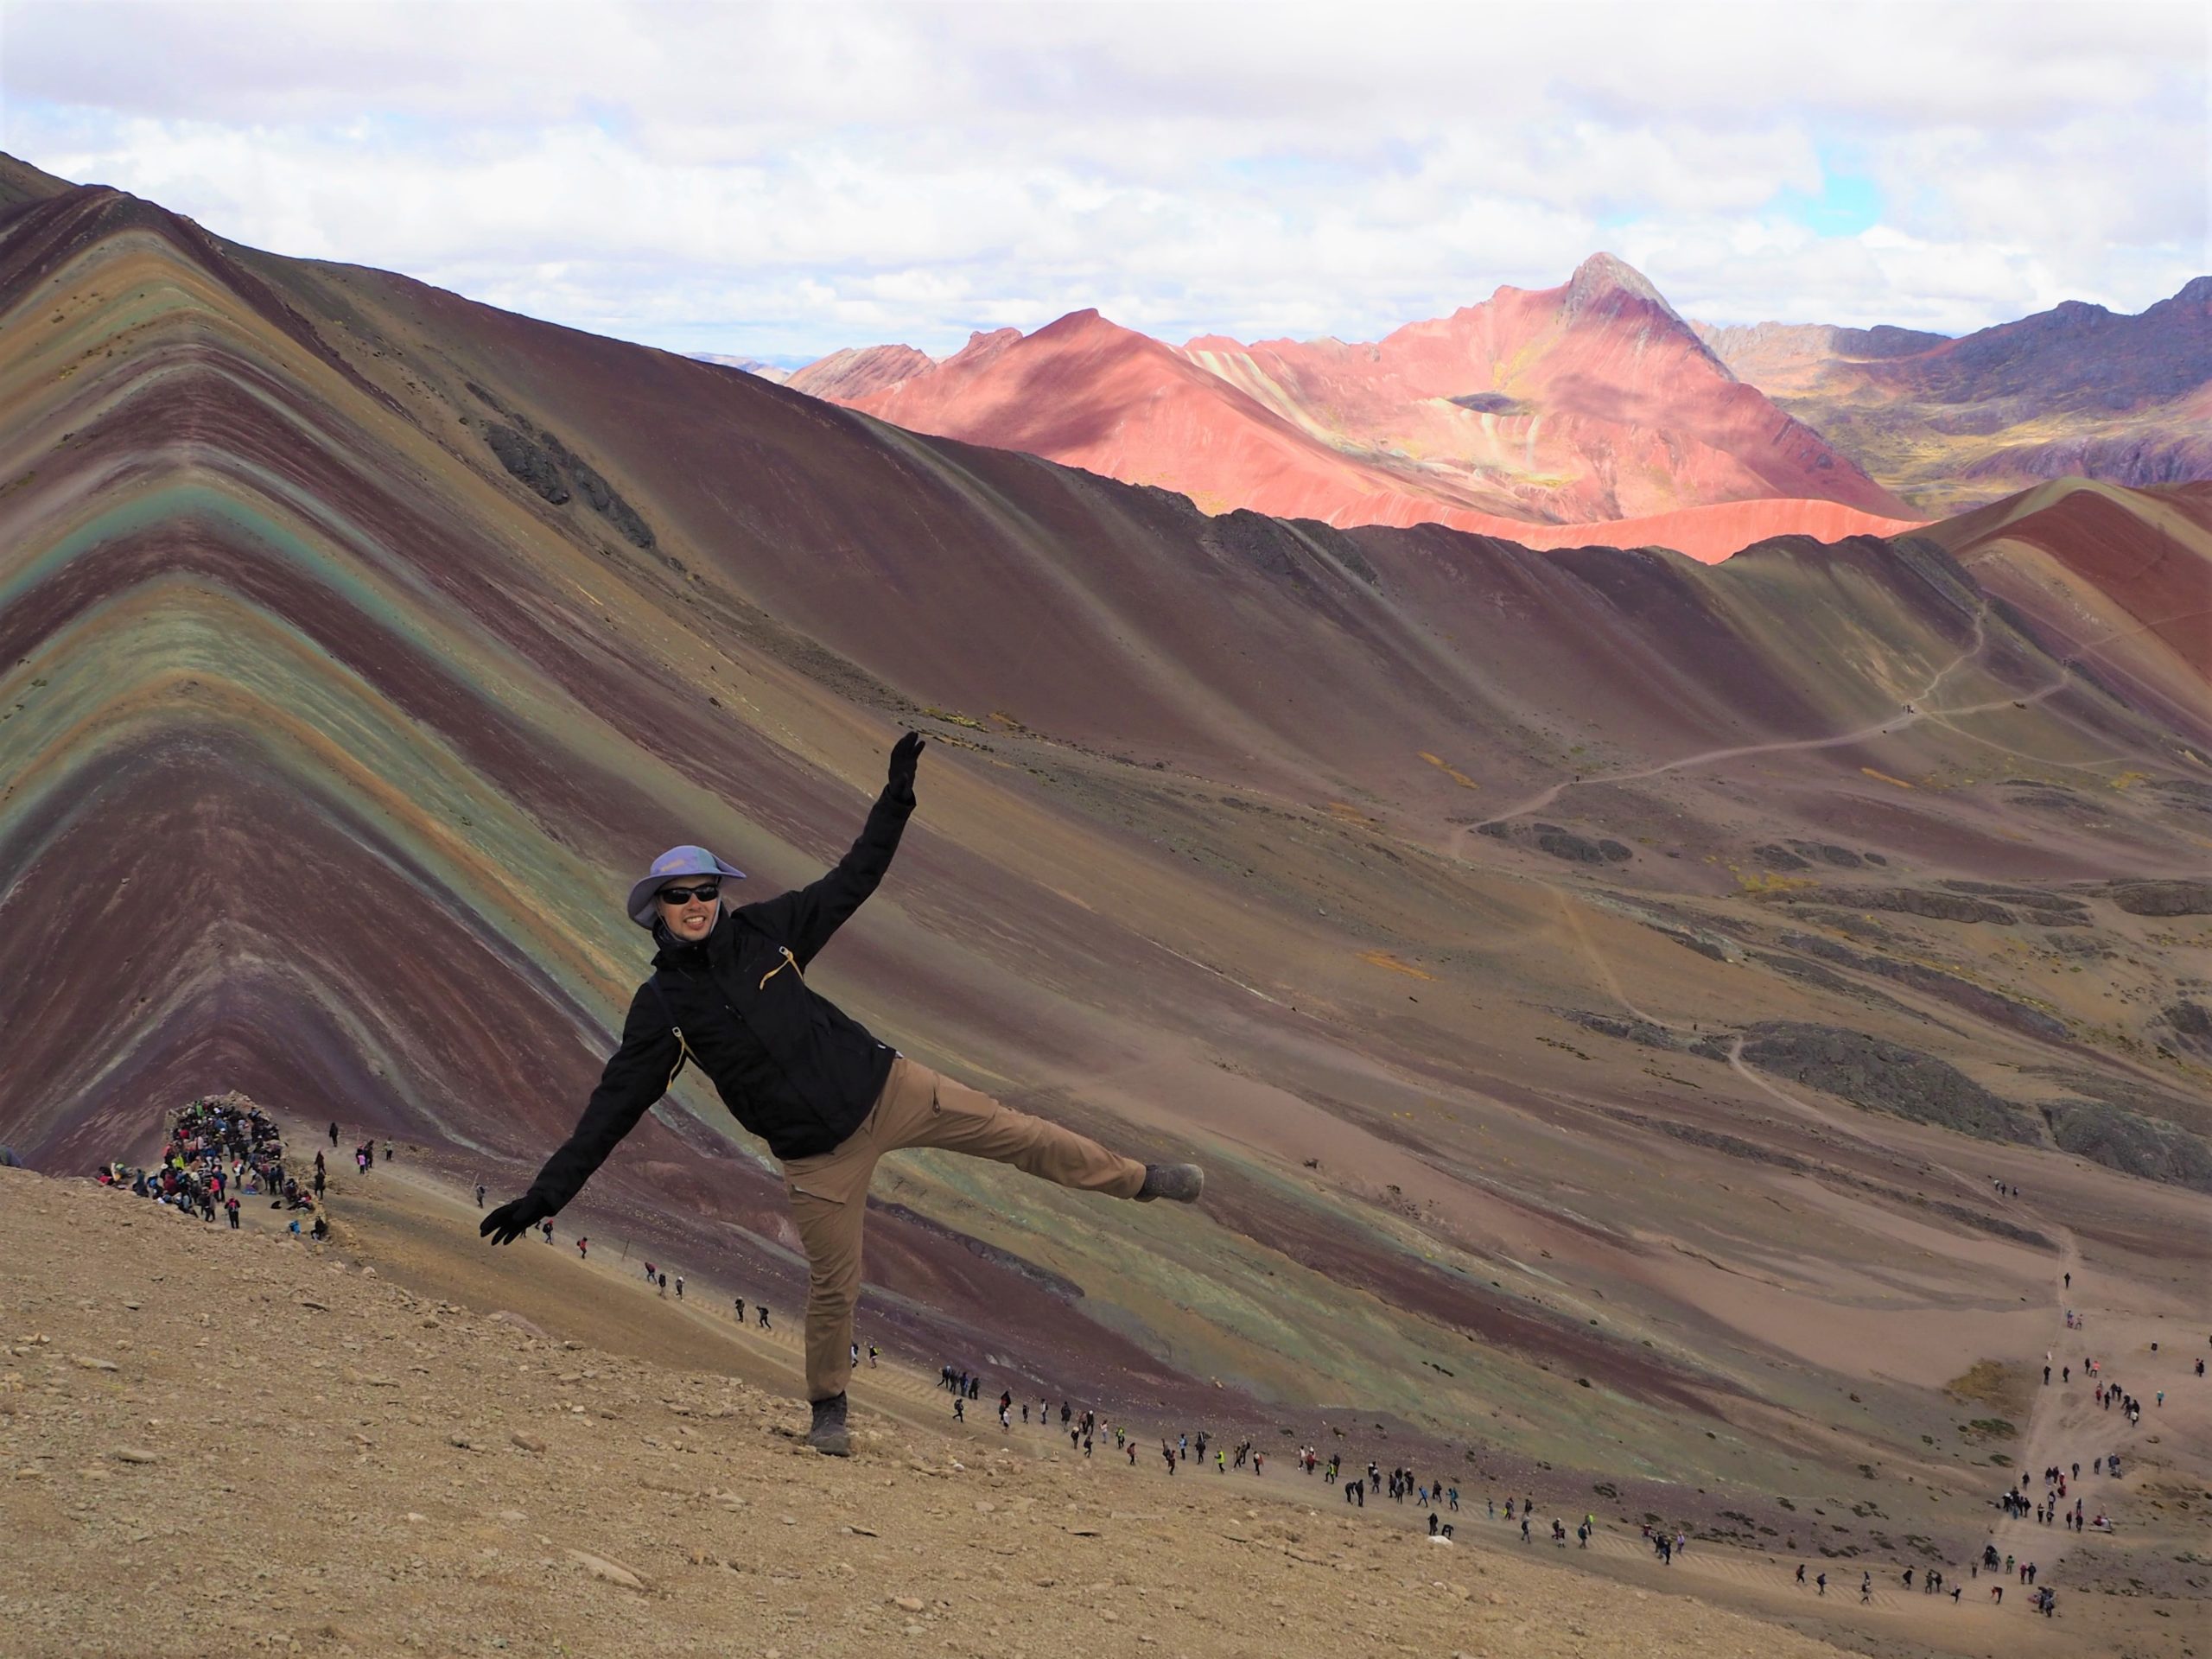
Once at the top
Well I’m not gonna lie, there was a lot of people. However, we never felt like it was too crowded and were able to take all the pictures we wanted.
A few thing surprised us, like the fact that there are locals with their typical clothing (both adults and children) who take a picture with you for a tip. Some of them also have alpacas (a few are really famous on Instagram as they appear constantly in tourists’ pictures).
The viewpoint was not a small spot but another mountain that faces directly Rainbow Mountain. This leaves you with a lot of room to take your pictures: you just need to climb a little bit more to find a less crowded spot.
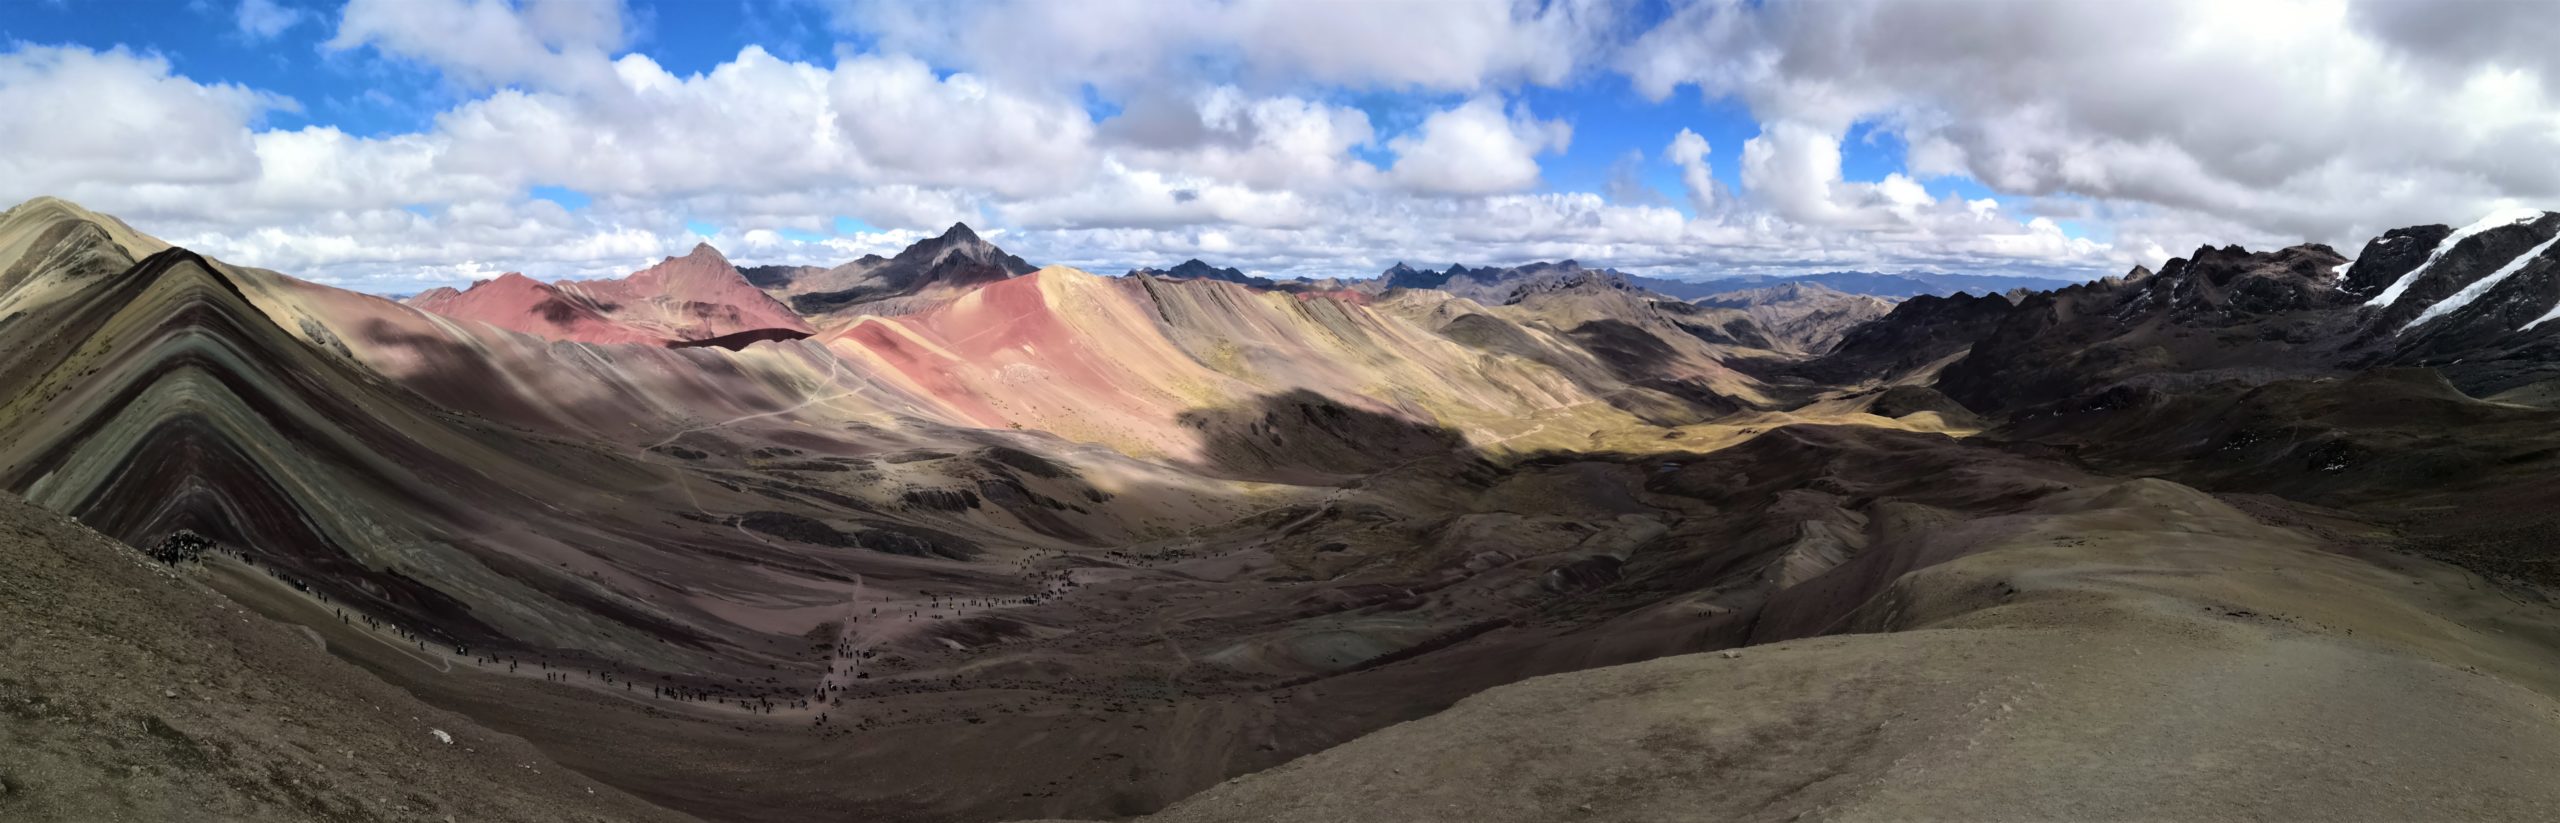
However, what surprised us the most was the landscape surrounding Rainbow Mountain. We had been so focused on the coloured hill that somehow we managed to forget that we were in high altitude (the highest we had ever been), in the middle of the Andes. The view was full of snowy peaks and valleys, clouds that played with the top of the mountains and falcons looking for some prey.

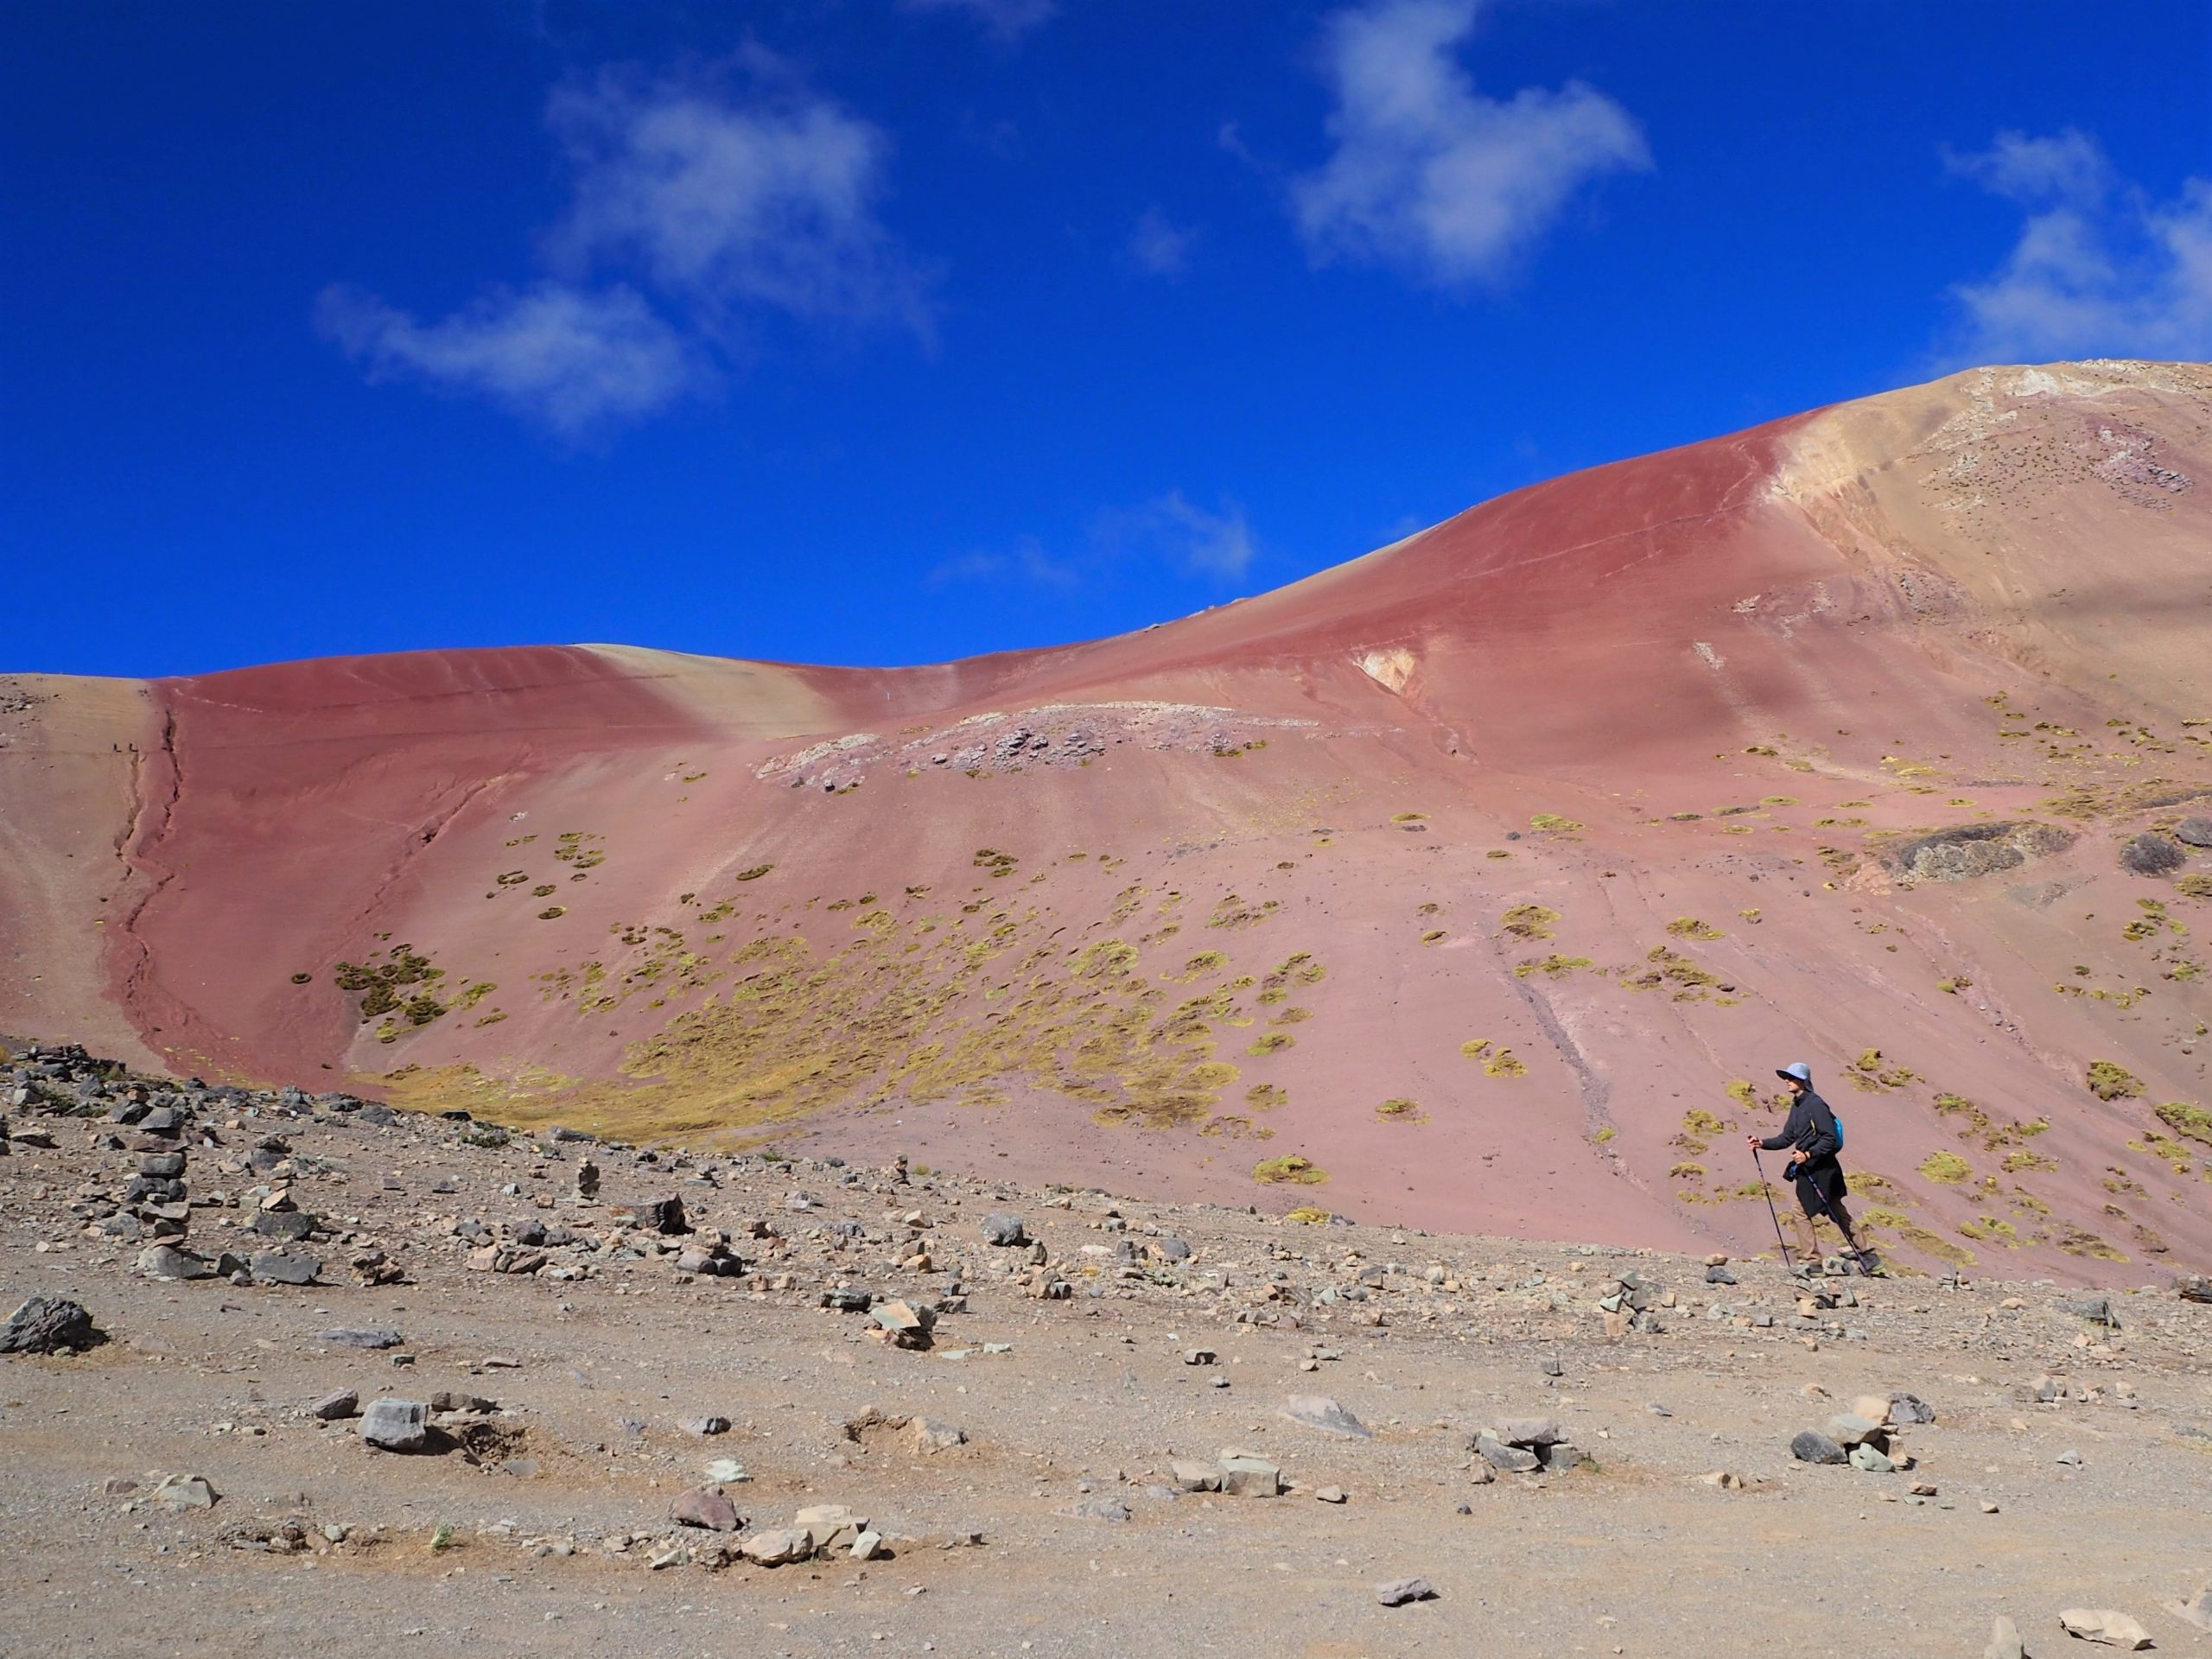
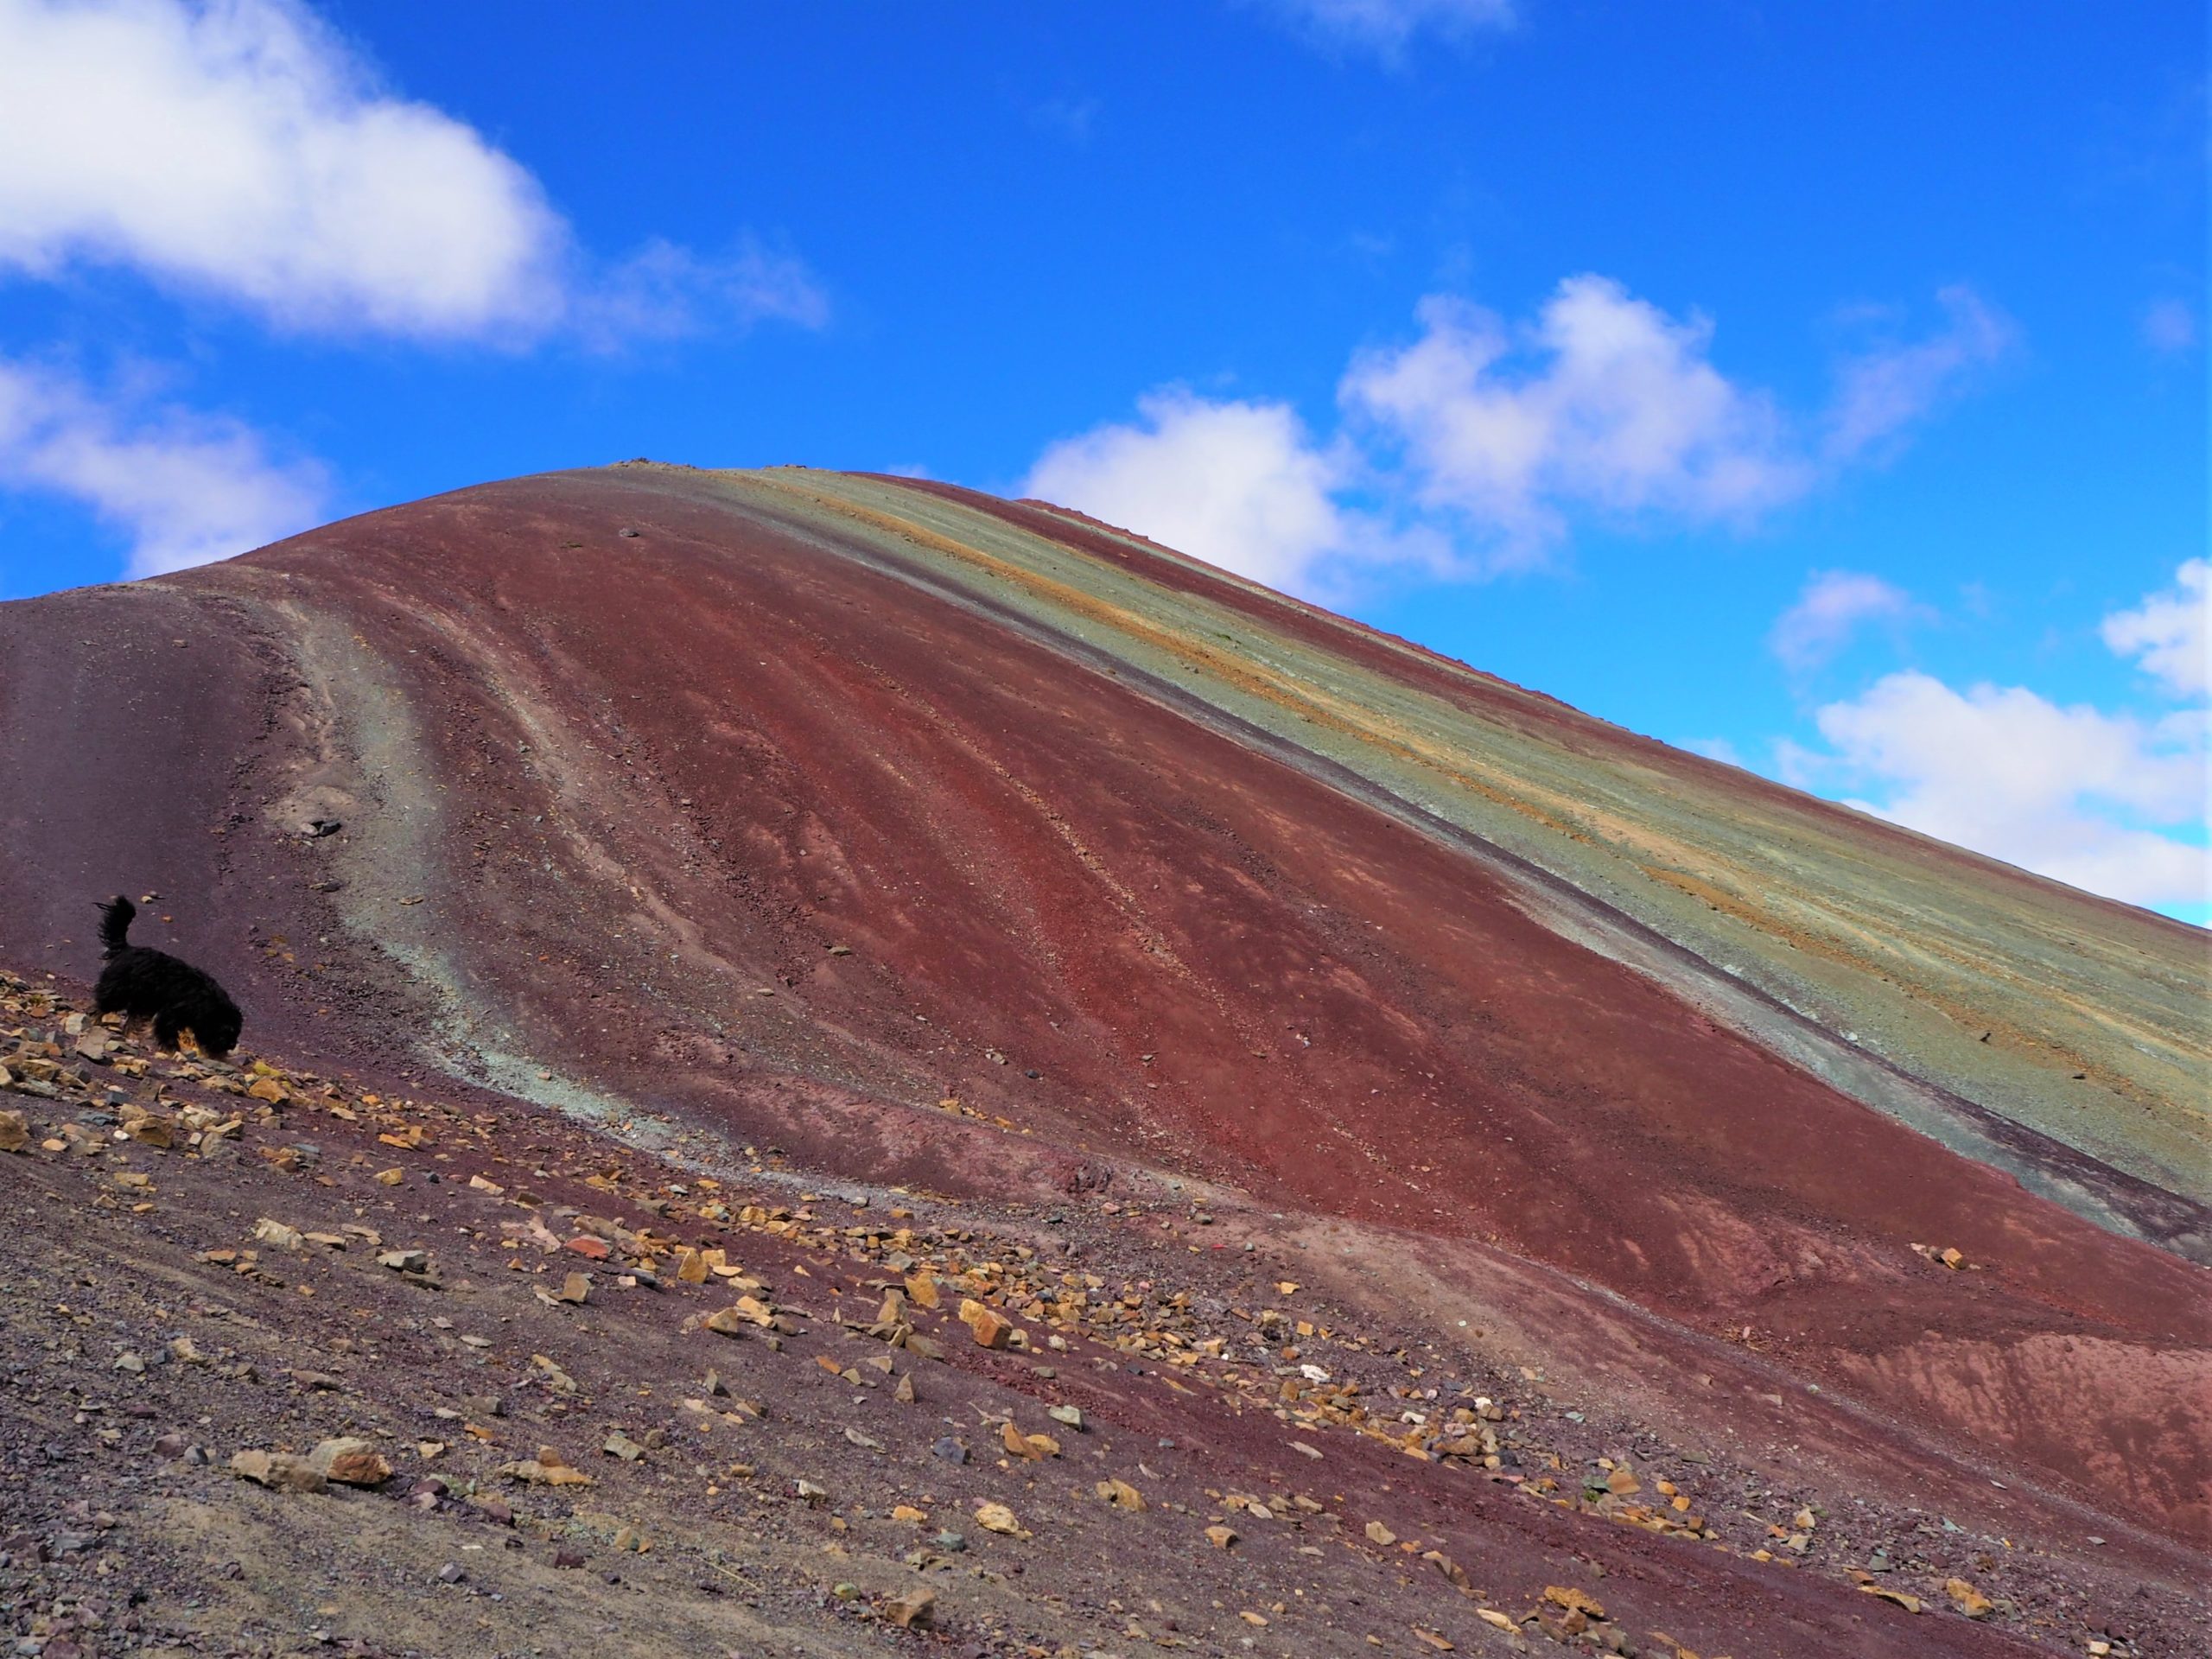
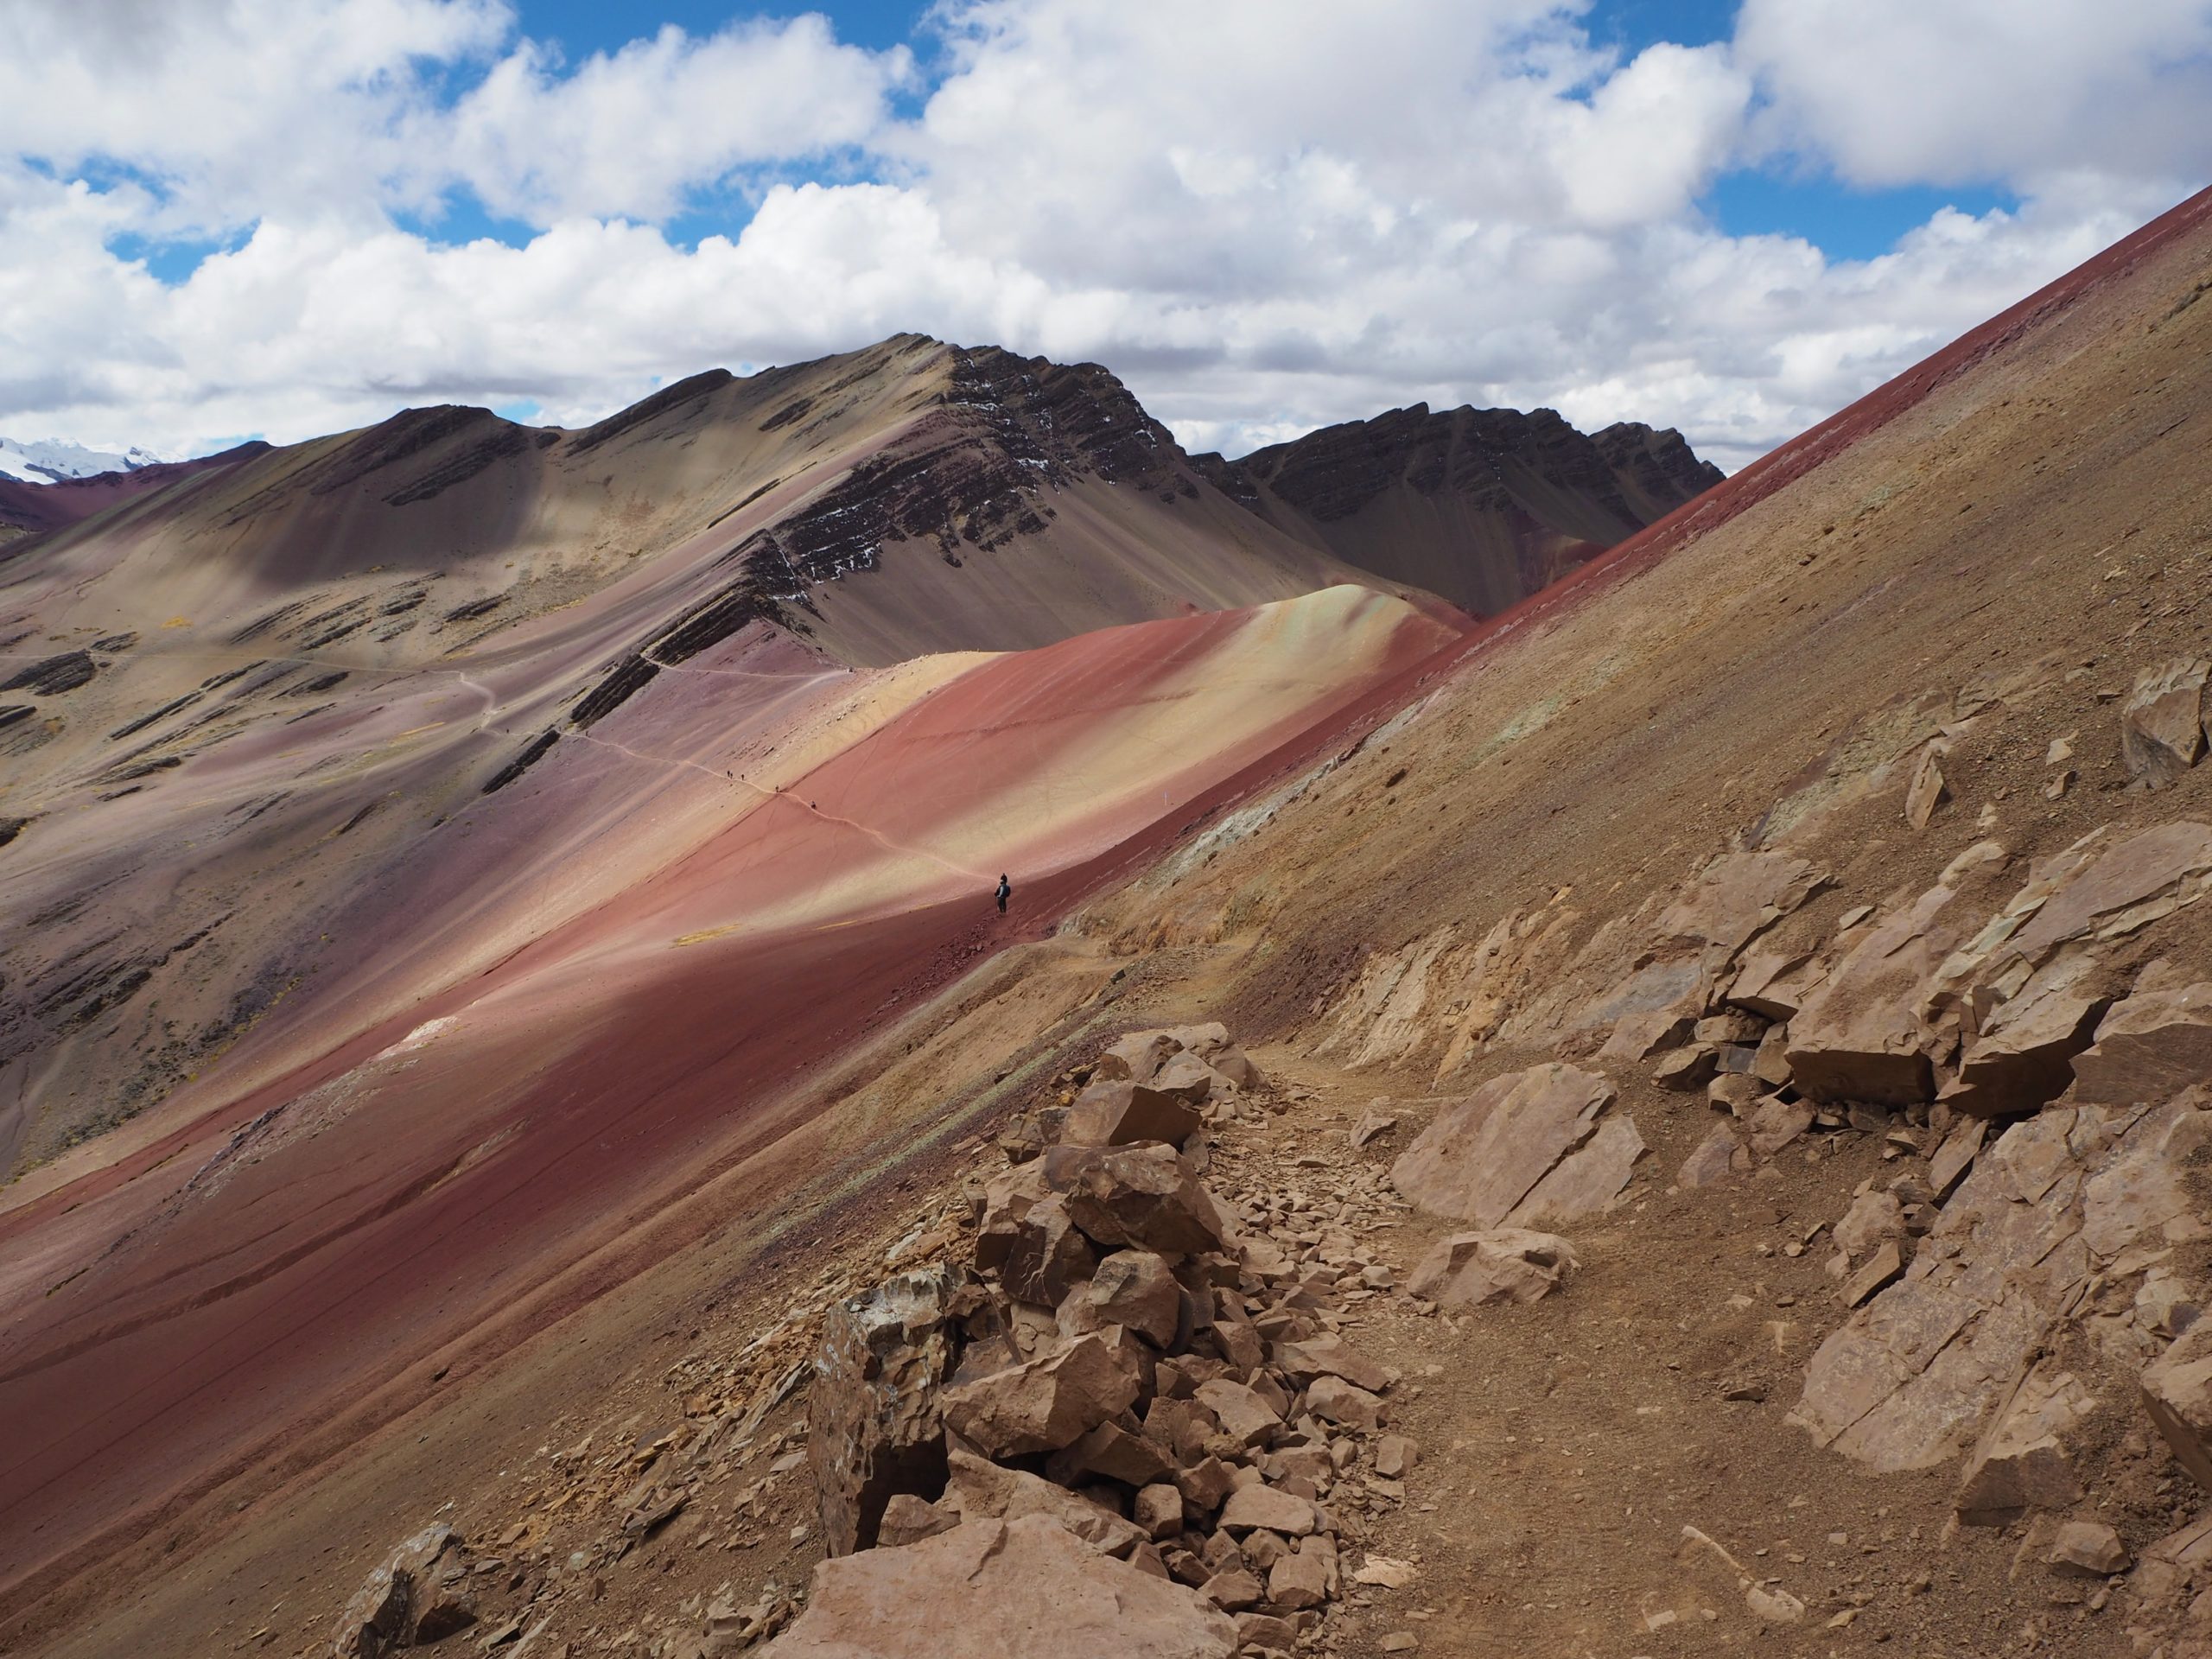
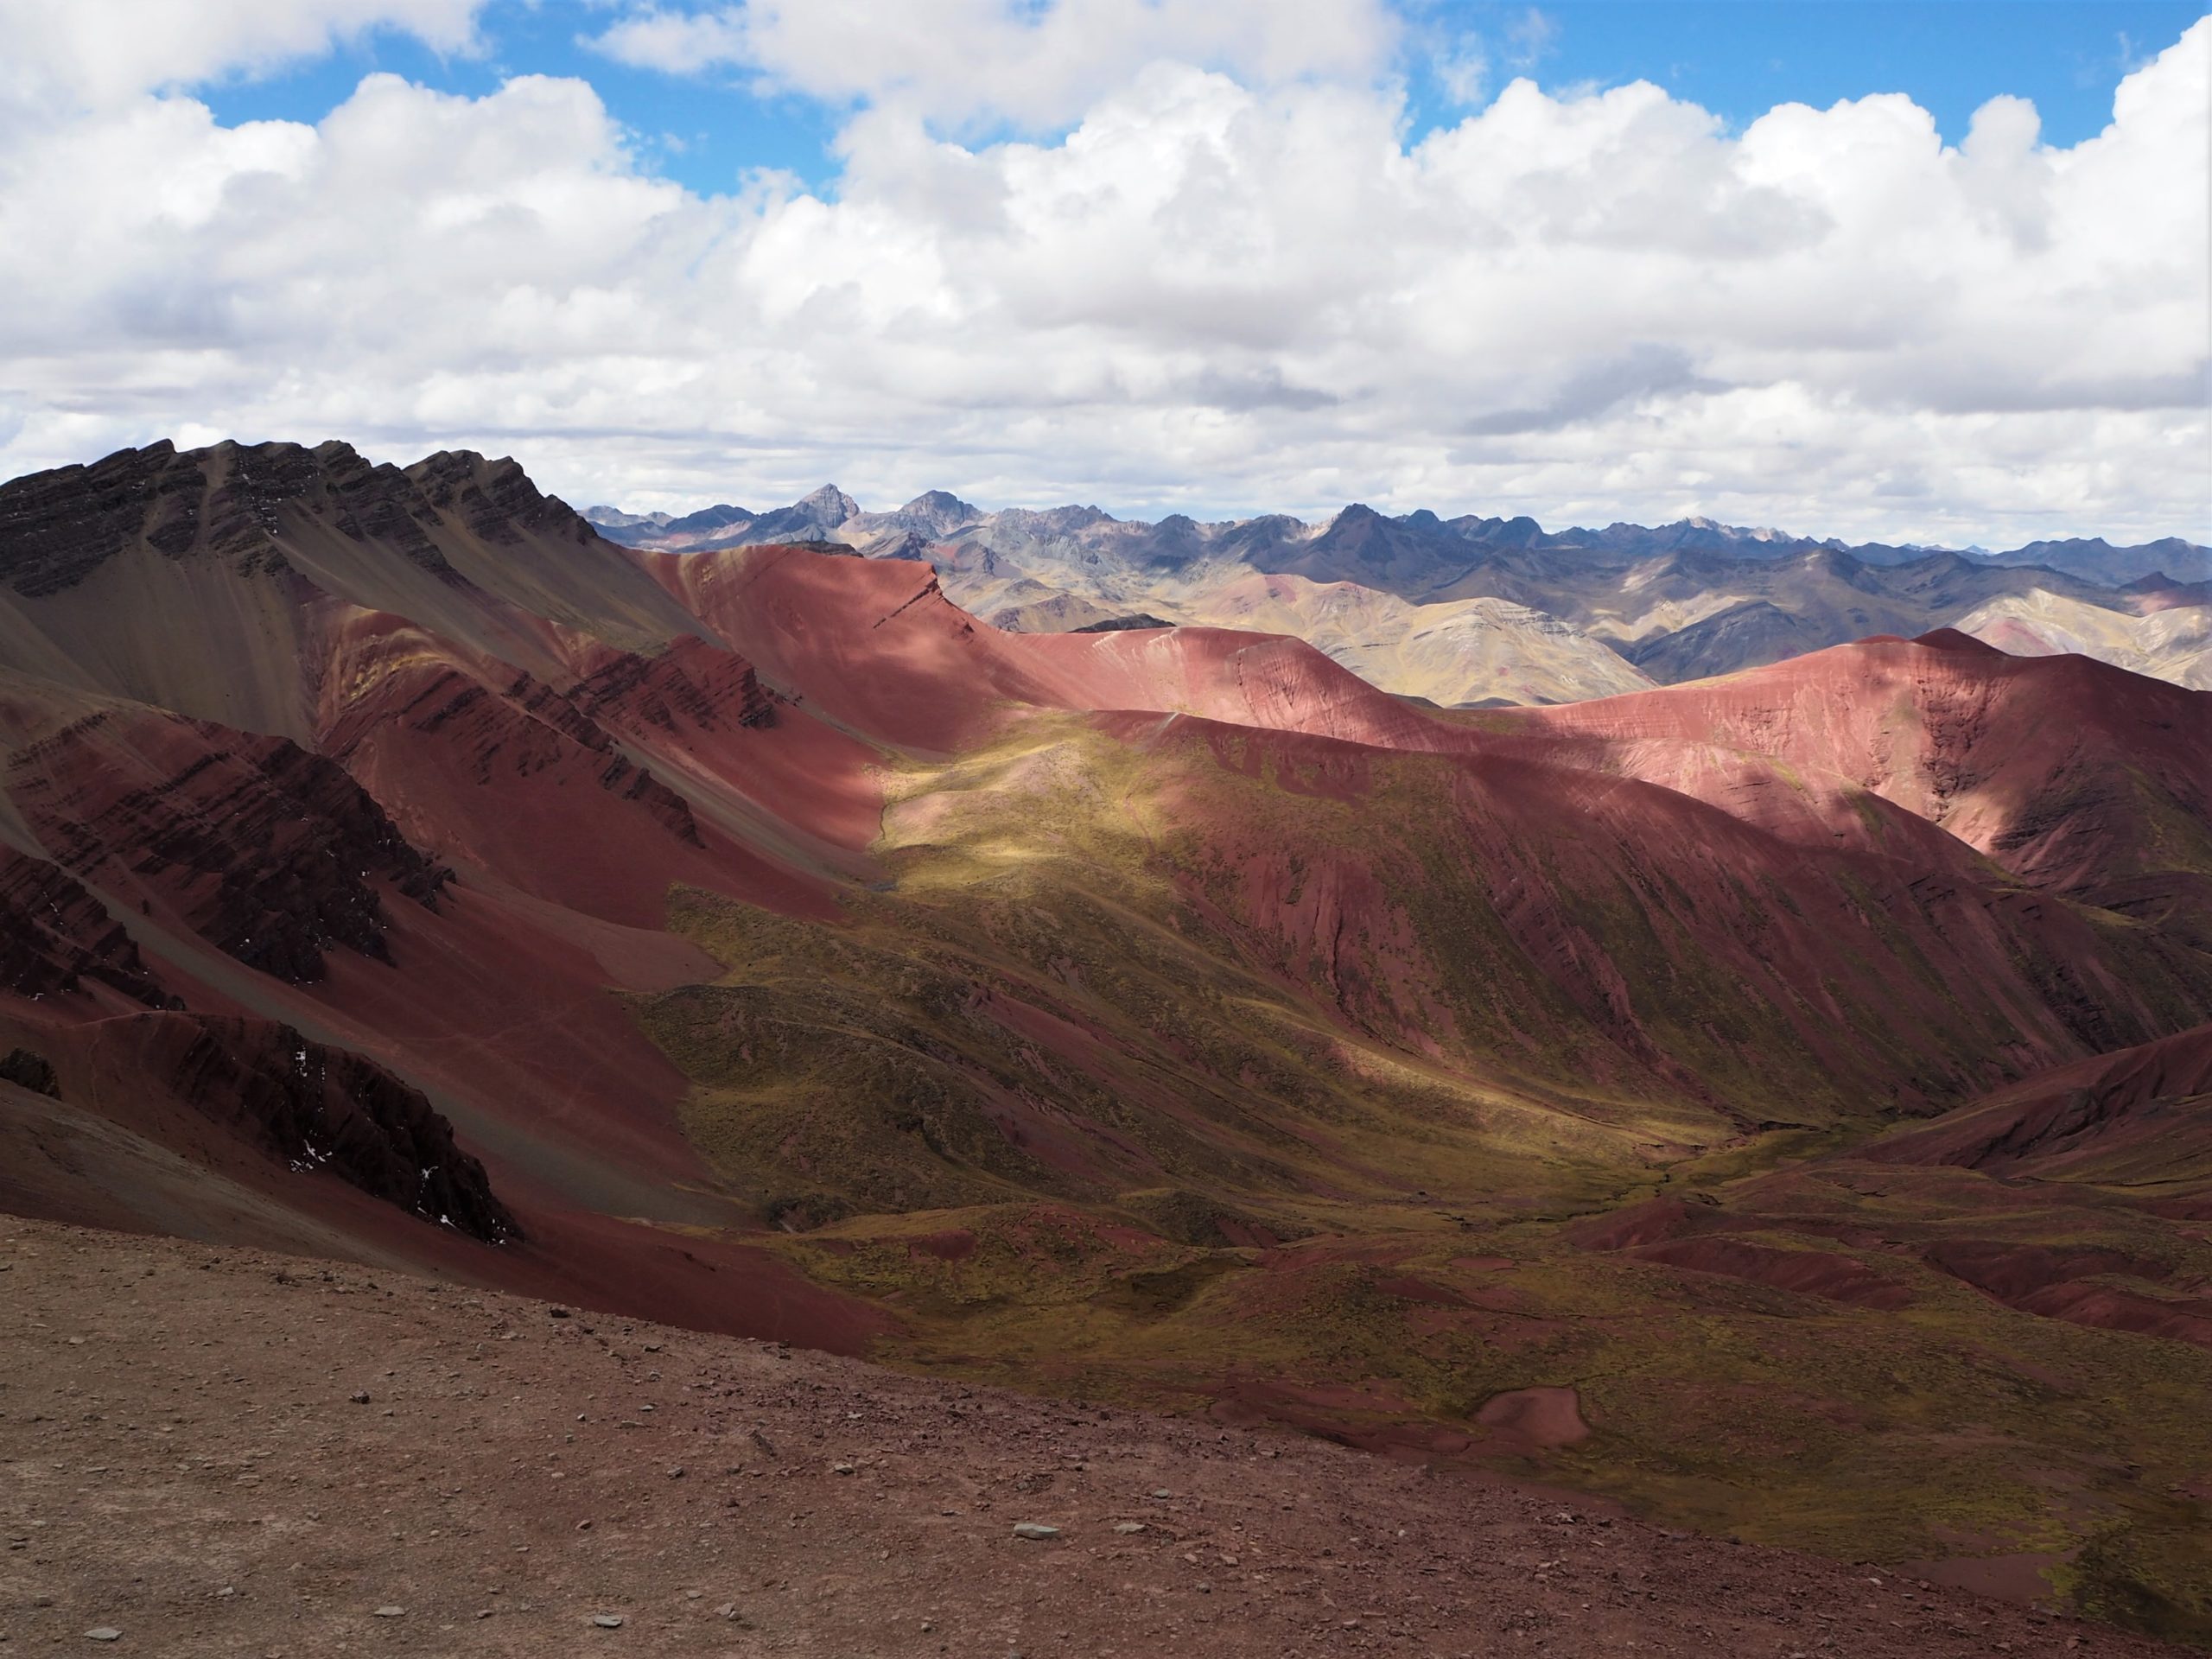
Side visit to Red Valley
It will only take you 20 minutes from the Rainbow Mountain viewpoint to arrive to the Red Valley. Again, the hike is only mildly ascending and way easier than the previous one, demanding a slight effort only for the last few minutes. You will need to pay the 10 PEN per person for the entry ticket.
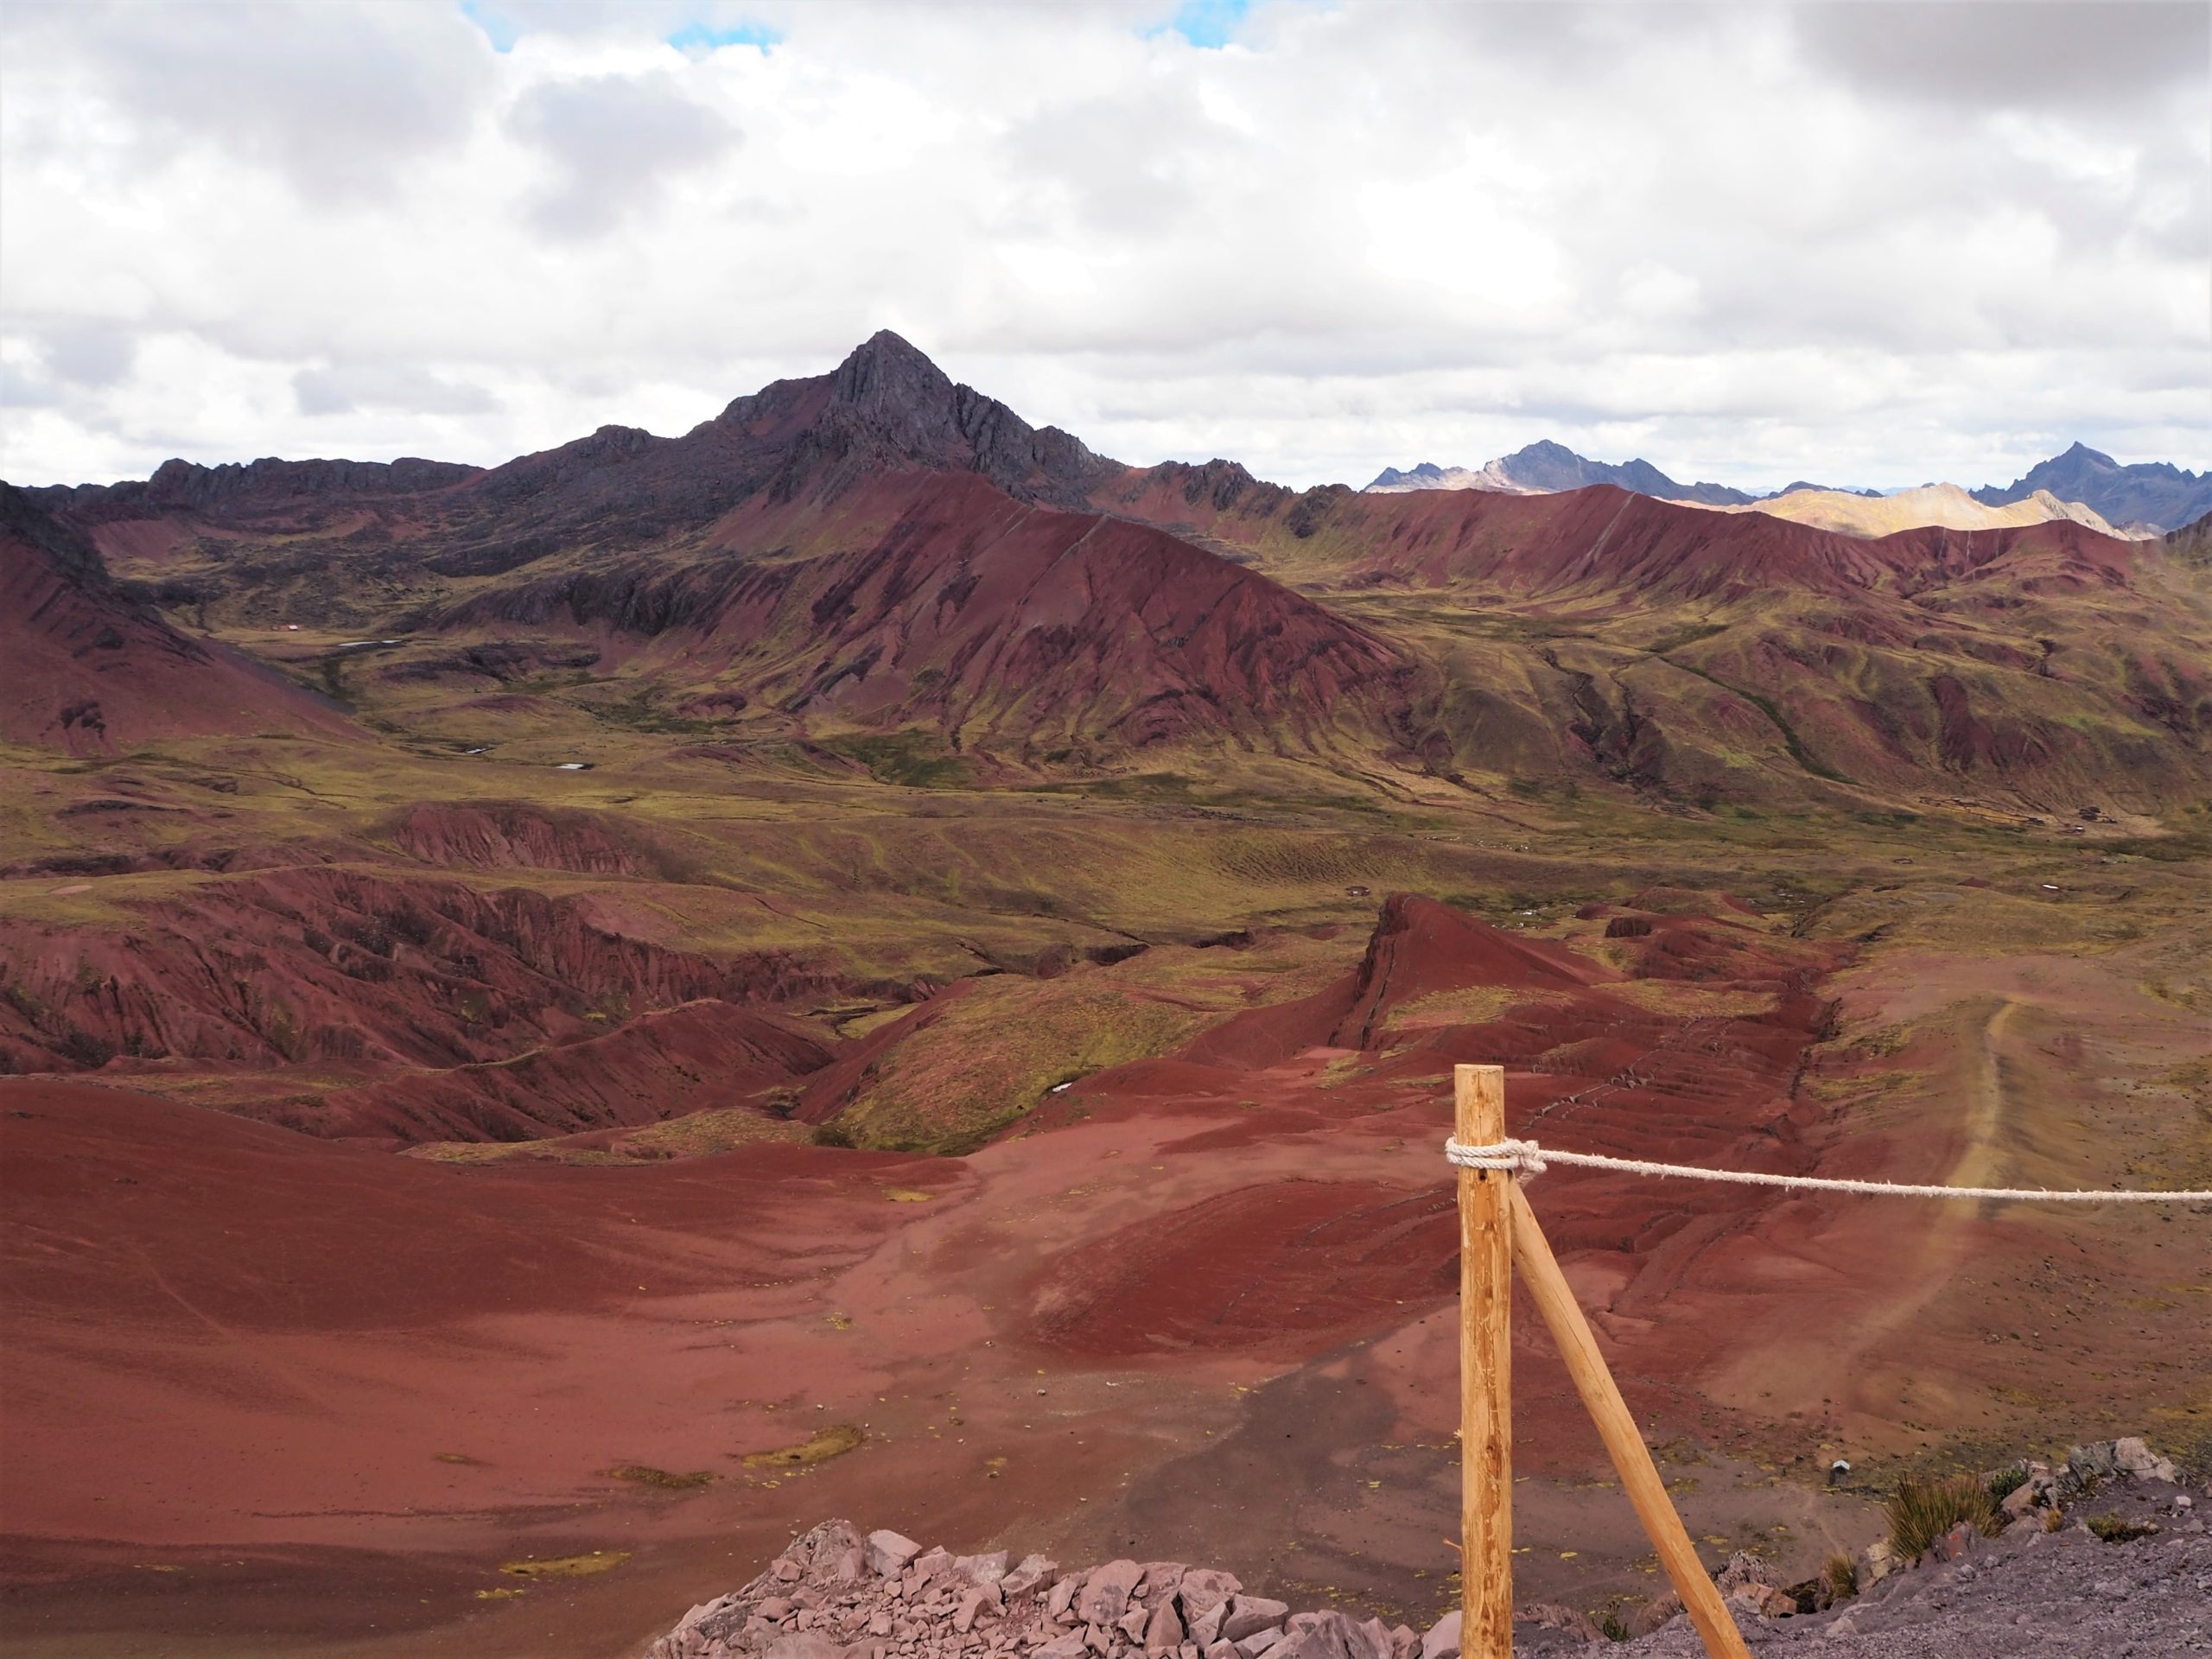
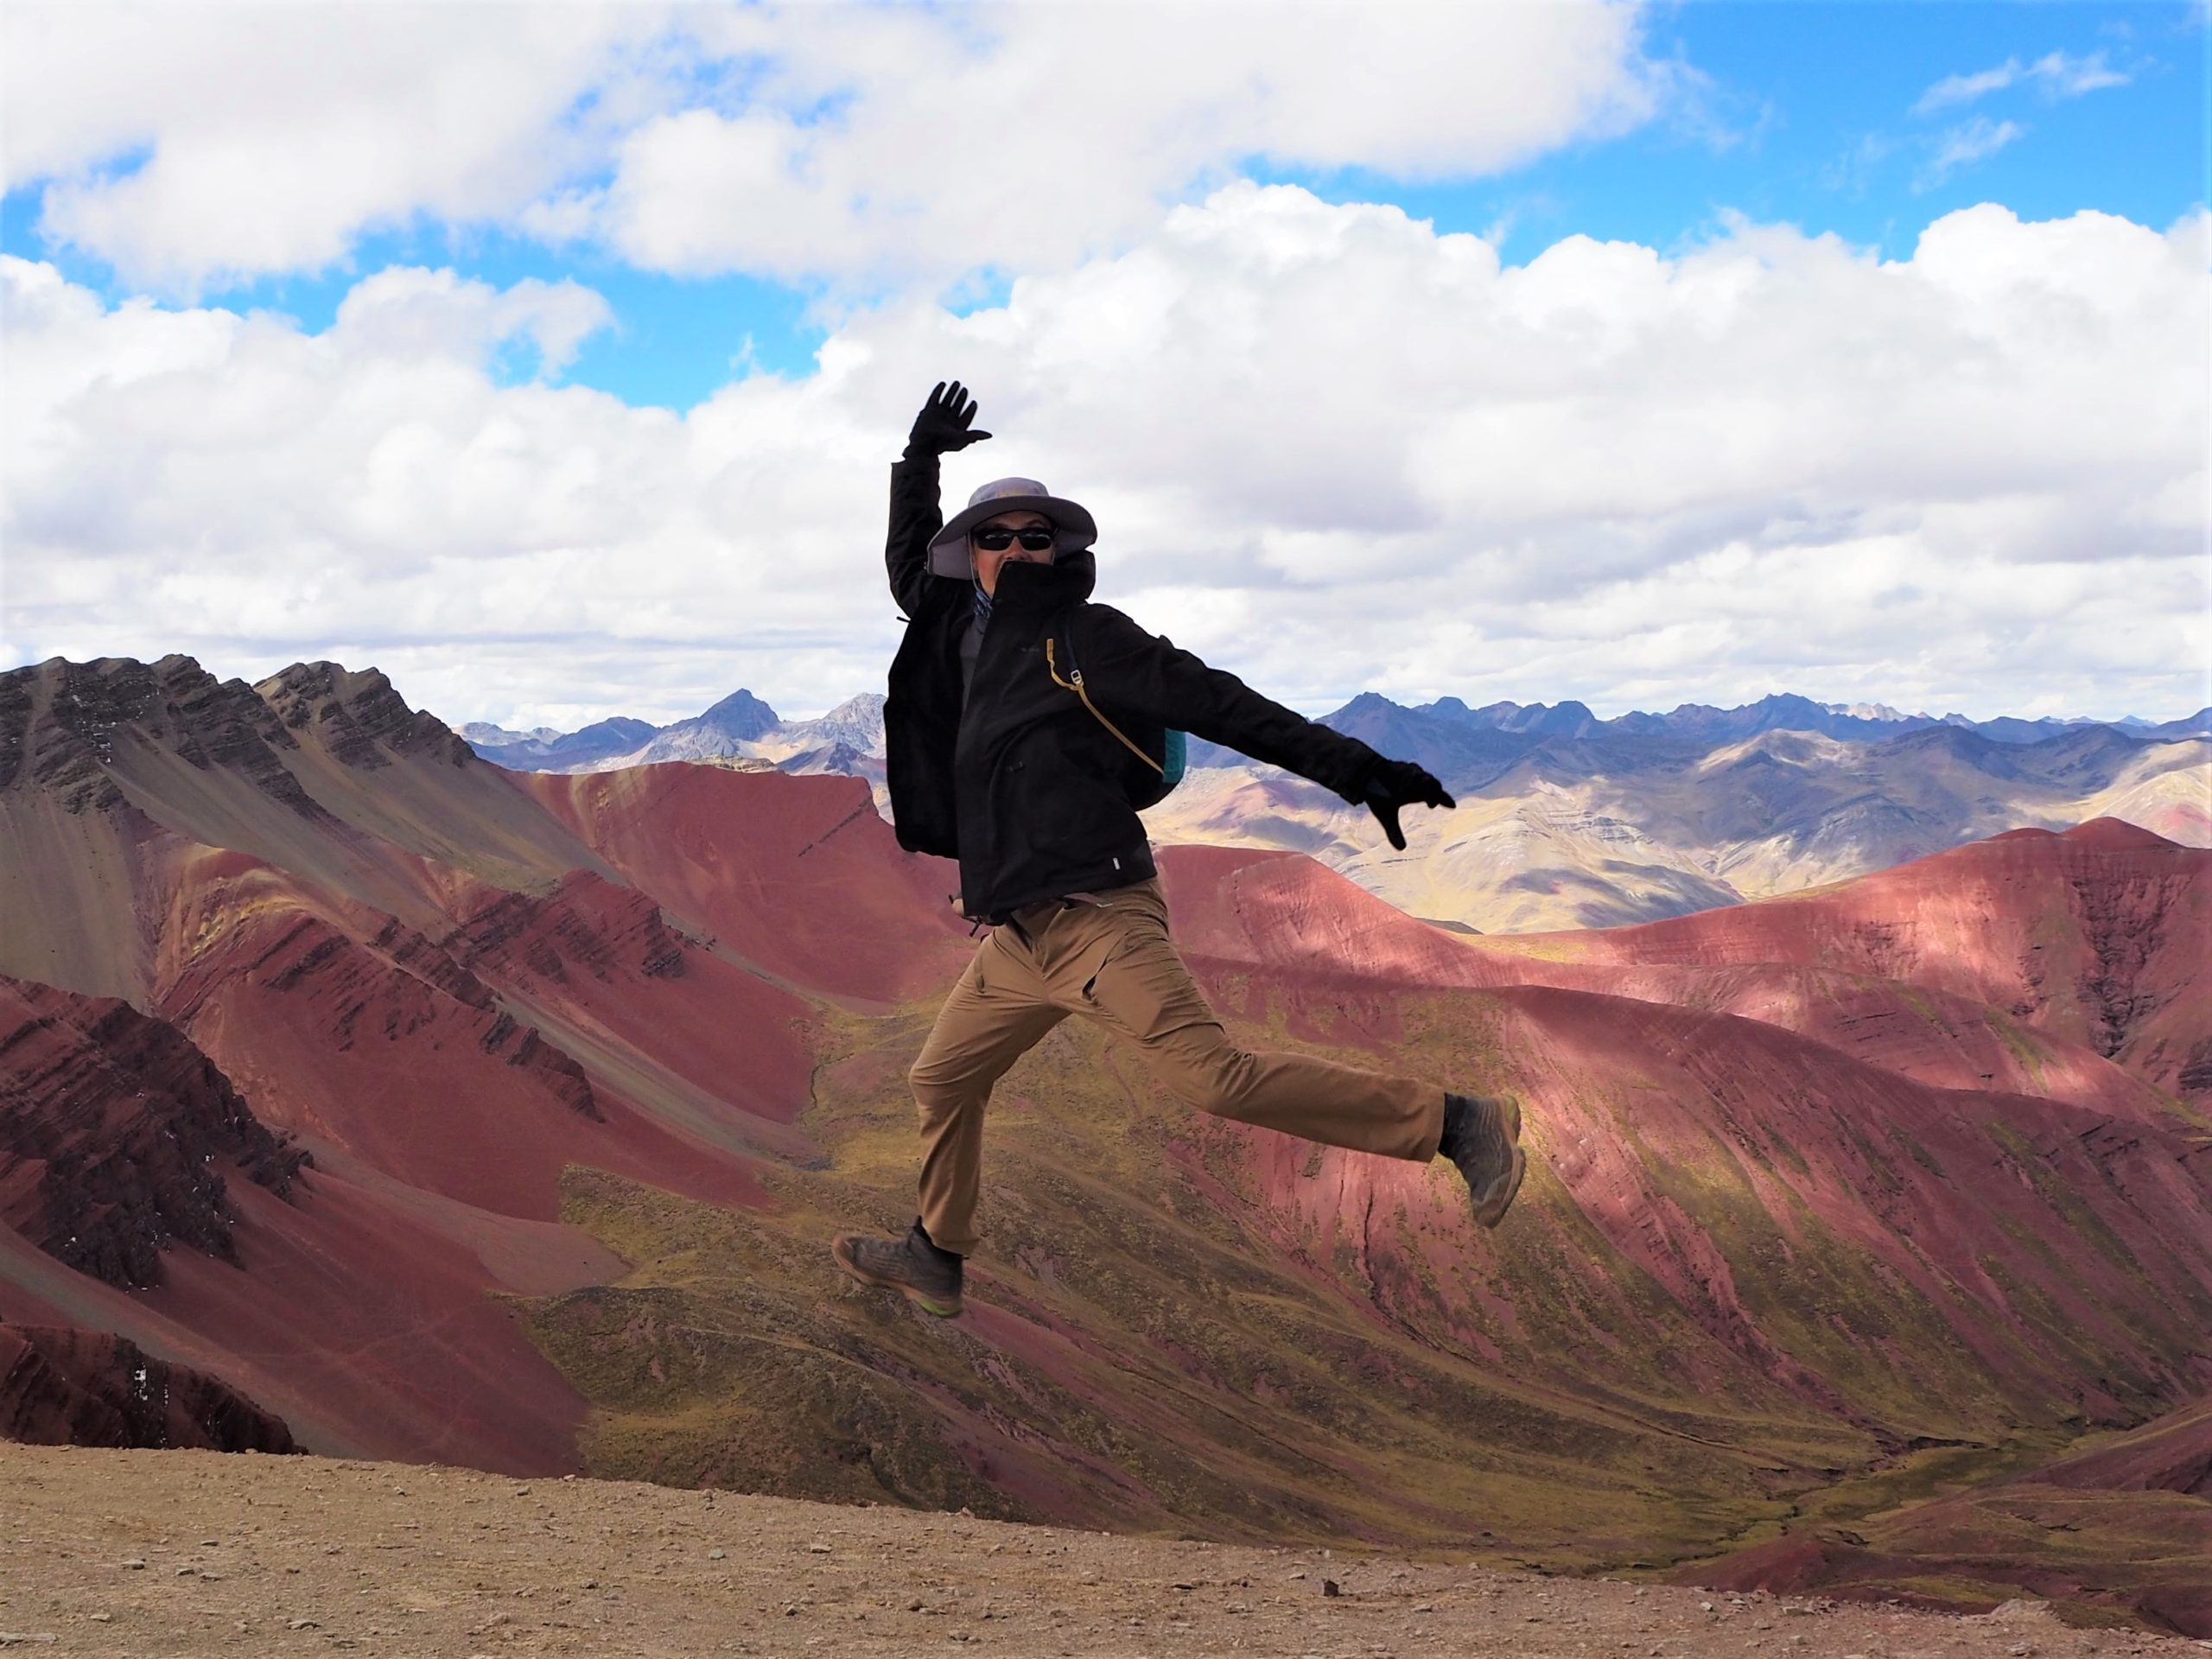
Once at the viewpoint, everything around us was a bright reddish brown that extended as far as eyes could see. We had no expectations so we were greatly surprised! The feeling was more of being on Mars than on Earth. Also, the fact that the four of us were completely alone up there did make for a more enjoyable experience.
The descend from the Red Valley to the parking lot was one of the highlights of our trip to Peru. For a while it was pure sand, so it was like running down a desert dune or scree. Our adventurous side (or maybe it was our inner child) was so happy for that experience!
Not all group tours to Rainbow Mountain allow you the time to visit also Red Valley. We recommend you to look for one that includes it: the extra effort is almost negligible and you truly feel as if you were in another world!
Cost breakdown
| Concept | Cost (per person) |
|---|---|
| Group trip | 55 PEN |
| Breakfast | Included in group trip |
| Lunch | Included in group trip |
| Ticket to Rainbow Mountain | 10 PEN |
| Ticket to Red Valley | 10 PEN |
| Horse ride up (optional) | 60 PEN |
| Horse ride down (optional) | 40 PEN |
| Passport stamp (optional) | 1 PEN |
4. Other utilities
Difficulty of hiking to Rainbow Mountain
The hike is not difficult as long as you are correctly equipped and in good physical condition. If Rainbow Mountain was at sea level this would absolutely be true and we wouldn’t need to discuss difficulty. However, this is not the case, and 5,200 m / 17,000 ft are no joke. Altitude sickness and the effects of lack of oxygen are very real and very serious. To give you an idea, it is mandatory for tour operators to carry oxygen with them in case anyone needs it.
So yes, you need to be in good physical shape for this trek but more importantly: you need to take altitude sickness seriously. For this reason I have compiled for you a pretty comprehensive section on altitude sickness and how to minimise it, check below!
Your shoes and how to dress
There is a lot of people visiting Rainbow Mountain that is not really familiarised with hiking. This is perfectly fine, but try to be adequately equipped! Remember that it’s more important to arrive to the top safely than to have a red carpet look for the picture.
Also, if you have everything you need with you, you will be less likely to buy a hat or overpriced socks in your breakfast stop because you feel you will need them. Then the decision will be if you actually want them or not!

The indispensables
- Shoes: you are hiking in a high altitude mountain, so appropriate shoes are of the utmost importance. Hiking boots or hiking trainers are perfect. If you don’t have those, wear regular trainers which support your feet, with a thick sole to avoid feeling every stone and with good grip. It should be obvious, but for some reason apparently it’s not. Some people visit Rainbow Mountain with sandals or flip flops. Don’t be that person.
- Comfortable clothing: it’s not necessary that they are specific for hiking, but sportive clothes are highly recommended. You don’t want to wear skinny uncomfortable jeans that limit the blood flow to your legs.
- Dress in layers: you will be leaving early from Cusco, a generally cold city. Also, the weather in high altitude is extremely changing, so it can shift from sunny to rainy in a minute. Your body temperature will also be different while climbing, because of the effort, than when you are at the windy top. It is essential to have a waterproof jacket and a scarf or similar.
- Wear a hat: the higher you are, the more intense the sun is. You don’t want to be lightheaded because of high altitude and also have your crown boiling. Also, the right hat will protect you from wind and cold.
- Put on sunscreen: honestly do not underestimate the sun at the mountains, even if it’s cloudy! It’s actually way worse for your skin and health than beach sun.
- Trekking poles: we had bought them for the Salkantay Trek and we decided to carry them to the Rainbow Mountain. It’s not really necessary.
5. Altitude sickness and how to minimise it
Altitude sickness (also acute mountain sickness (AMS) or soroche) is a health disorder that presents at high altitude, usually from 2,400 m (8,000 ft). The main symptoms of AMS are headache, nausea and other gastrointestinal disorders, fatigue, dizziness, insomnia, swelling extremities or face and rapid pulse. Other more serious complications may also occur. I strongly recommend you to read about them from reliable sources. In this link, you have an example of a reliable source, but check your own!
The main recommendation you will find to minimise altitude sickness is to drink plenty of water and to gain altitude progressively.
I think (and this is just my opinion here) that everyone’s body reacts different to altitude sickness. Also, from my (very limited) experience, I can say that being physically fit doesn’t mean you will not have any problem with AMS or that your symptoms would be mild.
Altitude sickness symptoms appear or get more severe the longer you stay at high altitude. For example, for us climbing to Rainbow Mountain was a piece of cake because we were extremely acclimated coming from the Salkantay Trek. We started feeling nauseous and lightheaded during our side visit to Red Valley.
Know your body
As everyone reacts different, it is key that you know how you will react. This will be useful mainly to eliminate the stress of not knowing what you may feel and being prepared for what you would actually feel. For example, having pills for a possible headache. So now that you are preparing, go for a walk in that high mountain you always wanted to visit!
If it is not possible for you to experience altitude sickness before your trip to Peru, you will have plenty of opportunities once you are there, which leads us to the next point:
Allow your body to adapt to high altitude
That basically means to spend some days at a high altitude before you visit Rainbow Mountain, so that your body can adapt to this new and lower amount of oxygen available and, therefore, you don’t suffer it for the first time when you are demanding a lot of effort from your muscles. There are several ways in which you can do this, for example:
- Spend two or three days in Cusco before visiting Rainbow Mountain. Cusco is located at 3,399 m (11,200 ft) high and its streets have a lot of up-and-downs. You will for sure feel the lack of breath during the first hours and then, how it gets easier. Cusco is the best location for the last-minute purchases such as trekking poles or whatever you may need. Also, you can do amazing trekkings from there like the Salkantay Trek or visit Machu Picchu. There are plenty of other one-day trips you can do from there: Ollantaytambo, Salineras de Maras…
- Program your trip to Peru so that you are progressively gaining altitude. Lima (sea level), Huacachina (456 m / 1,496 ft), Nazca (520 m / 1,710 ft), Arequipa (2,316 m / 7,600 ft), Cusco (3,399 m / 11,200 ft). It is really easy to do so because this is the itinerary that most tourists follow and, therefore, transportation is prepared for it.
- Arrive to Cusco from high altitude locations. You may be planning to visit also Titicaca Lake, La Paz (Bolivia) or Salar de Uyuni, which are all of them considerably high -in the same range than Rainbow Mountain-, and do not require a physical effort, therefore would be perfect spots to acclimate.
Take preventive medicine
This may be a controversial point, especially if you (as we did) come from countries where this medicine is not available. However, “Soroche pills“, as they are called in Peru, are very common there and available over-the-counter. You take them a few hours before you are exposed to high altitude. They are a mixture of Aspirin, Paracetamol and caffeine, so I wouldn’t question their safety as much as their effectiveness.
We took soroche pills and still experienced some mild symptoms of altitude sickness. We obviously have no way of knowing if they would have been worse if we hadn’t taken them.
Chew coca leaves and other local remedies
Just as Soroche pills, coca leaves are supposed to alleviate altitude sickness and are highly recommended by locals. You can buy them at local markets (don’t worry, they are not illegal!) and chew them while you are walking.
Another remedy that locals recommended is to have sweets or plain sugar, as sugar is supposed to play a role in the oxygenation of muscles.
Was this post on how to visit Rainbow Mountain useful for you? Please let me know and feel free to ask any question in the comments section! You can also support my work and Buy Me A Coffe. I will be immensely happy 🙂